
Instruction Manual
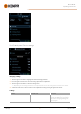
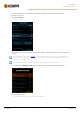
Table Of Contents
- 1. General
- 2. Installation
- 2.1 Installing power source mains plug
- 2.2 Installing cooling unit (optional)
- 2.3 Installing equipment on cart (optional)
- 2.4 Connecting welding gun
- 2.5 Installing earth return cable
- 2.6 Installing remote control (optional)
- 2.7 Installing and replacing feed rolls
- 2.8 Installing and replacing wire guide tubes
- 2.9 Installing and changing wire
- 2.10 Installing gas bottle and testing gas flow
- 2.11 How to get welding programs
- 3. Operation
- 3.1 Preparing welding system for use
- 3.2 Calibrating welding cable
- 3.3 Using control panel
- 3.3.1 Control panel: Home view
- 3.3.2 Control panel: Weld Assist
- 3.3.3 Control panel: Channels
- 3.3.4 Control panel: WPS view
- 3.3.5 Control panel: Welding parameters
- 3.3.6 Control panel: Weld history
- 3.3.7 Control panel: Info view
- 3.3.8 Control panel: Device settings
- 3.3.9 Control panel: Applying welding programs
- 3.3.10 Control panel: Weld data view
- 3.4 Additional guidance to functions and features
- 3.5 Pulse welding
- 3.6 Wireless connection (WLAN)
- 3.7 Using remote control
- 3.8 Changing welding polarity
- 3.9 Lifting equipment
- 4. Maintenance
- 5. Technical data

Master M 358
Operating manual - EN
1. Go to the Memory channels view. (Refer to "Control panel: Channels" on page39 for more information.)
2. Enter the actions menu.
3. Select Create channel.
>> A filter view opens.
4. Use the filter options (e.g. material, wire material or wire diameter) to find the welding programs best suited for the
purpose.
The operation mode set in the panel Settings determines for which main welding process the programs here are
shown. In MIG mode, the process selection in the Create channel view allows to narrow down the search more spe-
cifically to different MIG processes.
If manual MIG is selected as the process, other filter and welding program selections are disabled.
5. Once ready, go to the Welding program selection at the bottom to view the suitable welding programs.
6. Select a welding program.
>> The selected welding program is now shown in the filter view.
© Kemppi
54
1921980 / 2242