
Instruction Manual

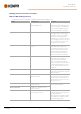
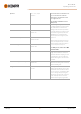
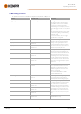
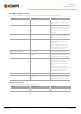
Table Of Contents
- 1. General
- 2. Installation
- 2.1 Installing power source mains plug
- 2.2 Installing cooling unit (optional)
- 2.3 Installing equipment on cart (optional)
- 2.4 Connecting welding gun
- 2.5 Installing earth return cable
- 2.6 Installing remote control (optional)
- 2.7 Installing and replacing feed rolls
- 2.8 Installing and replacing wire guide tubes
- 2.9 Installing and changing wire
- 2.10 Installing gas bottle and testing gas flow
- 2.11 How to get welding programs
- 3. Operation
- 3.1 Preparing welding system for use
- 3.2 Calibrating welding cable
- 3.3 Using control panel
- 3.3.1 Control panel: Home view
- 3.3.2 Control panel: Weld Assist
- 3.3.3 Control panel: Channels
- 3.3.4 Control panel: WPS view
- 3.3.5 Control panel: Welding parameters
- 3.3.6 Control panel: Weld history
- 3.3.7 Control panel: Info view
- 3.3.8 Control panel: Device settings
- 3.3.9 Control panel: Applying welding programs
- 3.3.10 Control panel: Weld data view
- 3.4 Additional guidance to functions and features
- 3.5 Pulse welding
- 3.6 Wireless connection (WLAN)
- 3.7 Using remote control
- 3.8 Changing welding polarity
- 3.9 Lifting equipment
- 4. Maintenance
- 5. Technical data

Master M 358
Operating manual - EN
1-MIG welding parameters
The parameters listed here are available for adjustment only with the 1-MIG process.
Parameter Parameter value Description
Trigger logic
2T, 4T, Powerlog (2 levels or 3 levels) Welding guns can have several altern-
ative trigger operation modes (trigger
logics). Most common are 2T and 4T. In
2T mode you hold the trigger down
while welding. In 4T mode you press and
release the trigger to start or to stop weld-
ing.
Note that enabling Powerlog opens addi-
tional Powerlog settings in the Welding
parameters view.
For more information, refer to "Trigger
logic functions" on page56.
Upslope
ON/OFF Upslope is a welding function that
determines the time, during which the
welding current gradually increases to
the desired welding current level at the
start of the weld. The upslope start level
and time are preset by the user.
- Upslope start level
10 ... 100 %, Auto, step 1
Default = 50
- Upslope time
0.1 ... 5 s, Auto, step 0.1
Default = 0.10
Hot start
ON/OFF Welding function that uses higher or
lower wire feed speed and welding cur-
rent at the start of the weld. After the Hot
start period the current changes to nor-
mal welding current level. This facilitates
the start of the weld especially with alu-
minum materials. The Hot start level and
time (only in 2T trigger mode) are preset
by the user.
- Hot start level
-50 ... +200 %, Auto, step 1
Default = 40
- Hot start time
0.0 ... 9.9 s, Auto, step 0.1
Default = 1.2 s
Wise feature
None, WiseFusion, WisePenetration+,
WiseSteel
When selected, a list of available Wise fea-
tures is opened for selection. For more
information on these features, refer to
"Additional guidance to functions and
features" on page56.
(Not available with MAX Cool, MAX
Speed and MAX Position.)
Fine tuning
Example: -10.0 ... +10.0 V *
Step 0.1 V
Fine tuning of the welding voltage.
* The voltage range for fine tuning is
defined by the active welding program.
Crater fill
ON/OFF When welding with high power, a crater
is usually formed at the end of the weld.
The Crater fill function decreases the
welding power / wire feed speed at the
end of the welding job so that the crater
can be filled using a lower power level.
With 1-MIG process, Crater fill start level,
duration and end level are preset by the
user.
- Crater fill start level
10 ... 150 %, Auto, step 1
Default = 100
- Crater filltime
0.0 ... 10.0 s, Auto, step 0.1
Default = 1.0 s
- Crater fillend level
10 ... 150 %, Auto, step 1
Default = 30
Current
15 ... 350 A, step 1
Default = 50 A
Welding current adjustment with
WisePenetration+ only.
© Kemppi
47
1921980 / 2242