
Instruction Manual
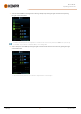
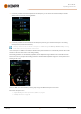

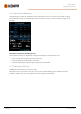
Table Of Contents
- 1. General
- 2. Installation
- 2.1 Installing power source mains plug
- 2.2 Installing cooling unit (optional)
- 2.3 Installing equipment on cart (optional)
- 2.4 Connecting welding gun
- 2.5 Installing earth return cable
- 2.6 Installing remote control (optional)
- 2.7 Installing and replacing feed rolls
- 2.8 Installing and replacing wire guide tubes
- 2.9 Installing and changing wire
- 2.10 Installing gas bottle and testing gas flow
- 2.11 How to get welding programs
- 3. Operation
- 3.1 Preparing welding system for use
- 3.2 Calibrating welding cable
- 3.3 Using control panel
- 3.3.1 Control panel: Home view
- 3.3.2 Control panel: Weld Assist
- 3.3.3 Control panel: Channels
- 3.3.4 Control panel: WPS view
- 3.3.5 Control panel: Welding parameters
- 3.3.6 Control panel: Weld history
- 3.3.7 Control panel: Info view
- 3.3.8 Control panel: Device settings
- 3.3.9 Control panel: Applying welding programs
- 3.3.10 Control panel: Weld data view
- 3.4 Additional guidance to functions and features
- 3.5 Pulse welding
- 3.6 Wireless connection (WLAN)
- 3.7 Using remote control
- 3.8 Changing welding polarity
- 3.9 Lifting equipment
- 4. Maintenance
- 5. Technical data

Master M 358
Operating manual - EN
3. If a memory channel has been already linked to the weld pass, you can activate the selected weld pass and the
default memory channel by selecting 'Activate'.
4. If a memory channel has not been linked to the weld pass previously, you can link the weld pass to an existing
memory channel ('Select linked channel').
A memory channel can also be linked to a weld pass on a dWPS through the Memory channels view by selecting
'Link to WPS' in the memory channel's actions menu.
Once a weld pass on a dWPS is activated, the default memory channel linked to it is automatically selected. This is indic-
ated also in the home view and on screen during welding.
The welding parameters are still manually adjustable, but the adjustment ranges defined on the active WPS are indic-
ated on the screen. If you adjust the welding parameters outside the WPS adjustment range, the control panel shows a
warning on the screen:
The active WPS can be deactivated by selecting 'Stop using' in the WPS's weld pass actions menu.
More feature descriptions here:
>> "Digital Welding Procedure Specification (dWPS)" on page62
>> "WeldEye ArcVision" on page62
© Kemppi
43
1921980 / 2242