
Instruction Manual
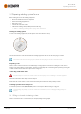
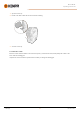
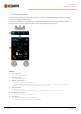
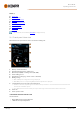
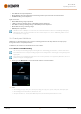
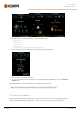
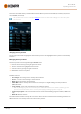
Table Of Contents
- 1. General
- 2. Installation
- 2.1 Installing power source mains plug
- 2.2 Installing cooling unit (optional)
- 2.3 Installing equipment on cart (optional)
- 2.4 Connecting welding gun
- 2.5 Installing earth return cable
- 2.6 Installing remote control (optional)
- 2.7 Installing and replacing feed rolls
- 2.8 Installing and replacing wire guide tubes
- 2.9 Installing and changing wire
- 2.10 Installing gas bottle and testing gas flow
- 2.11 How to get welding programs
- 3. Operation
- 3.1 Preparing welding system for use
- 3.2 Calibrating welding cable
- 3.3 Using control panel
- 3.3.1 Control panel: Home view
- 3.3.2 Control panel: Weld Assist
- 3.3.3 Control panel: Channels
- 3.3.4 Control panel: WPS view
- 3.3.5 Control panel: Welding parameters
- 3.3.6 Control panel: Weld history
- 3.3.7 Control panel: Info view
- 3.3.8 Control panel: Device settings
- 3.3.9 Control panel: Applying welding programs
- 3.3.10 Control panel: Weld data view
- 3.4 Additional guidance to functions and features
- 3.5 Pulse welding
- 3.6 Wireless connection (WLAN)
- 3.7 Using remote control
- 3.8 Changing welding polarity
- 3.9 Lifting equipment
- 4. Maintenance
- 5. Technical data

Master M 358
Operating manual - EN
• Pulse MIG:Wire feed speed adjustment
• DPulse MIG:Wire feed speed adjustment and switching between pulse levels with control knob button
• TIG/MMA: Welding current adjustment
Right control knob:
• Manual MIG: Welding voltage adjustment
• 1-MIG:Fine tuning of welding voltage or Wise/MAX parameter adjustment
• Pulse MIG: Fine tuning of welding voltage or Wise/MAX parameter adjustment
• DPulse MIG: Fine tuning of welding voltage
• MMA:Dynamics adjustment.
With Wise features or MAX processes turned on, the control knob functions in Home view and during welding may
differ from the above. For more information on these features and processes, refer to "Additional guidance to func-
tions and features" on page56.
3.3.2 Control panel: Weld Assist
Weld Assist is a wizard-like utility for easy selection of welding parameters. The utility walks the user step-by-step
through the selection of required parameters.
In Weld Assist, the selections are made with the two control knobs.
To use Weld Assist with MIG welding:
The currently selected welding program,including filler wire and shielding gas information,is shown and used as a
basis in Weld Assist. If necessary, the welding program can be changed before continuing by selecting 'Change weld-
ing program'.
If the currently selected welding program (on the active memory channel) is not supported by Weld Assist, the user is
guided to change the welding program.
1. To start, go to the Weld Assist view and select 'Next' with the control knob button.
2. Select:
>> The welding joint type: butt joint / corner joint / edge joint / lap joint / T-joint / tube joint / tube+plate joint.
>> The welding position: PA / PB / PC / PD / PE / PF / PG
>> The plate thickness (1...10 mm). Note: With PG position, the maximum plate thickness is 3 mm.
© Kemppi
38
1921980 / 2242