
Instruction Manual
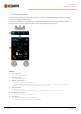

Table Of Contents
- 1. General
- 2. Installation
- 2.1 Installing power source mains plug
- 2.2 Installing cooling unit (optional)
- 2.3 Installing equipment on cart (optional)
- 2.4 Connecting welding gun
- 2.5 Installing earth return cable
- 2.6 Installing remote control (optional)
- 2.7 Installing and replacing feed rolls
- 2.8 Installing and replacing wire guide tubes
- 2.9 Installing and changing wire
- 2.10 Installing gas bottle and testing gas flow
- 2.11 How to get welding programs
- 3. Operation
- 3.1 Preparing welding system for use
- 3.2 Calibrating welding cable
- 3.3 Using control panel
- 3.3.1 Control panel: Home view
- 3.3.2 Control panel: Weld Assist
- 3.3.3 Control panel: Channels
- 3.3.4 Control panel: WPS view
- 3.3.5 Control panel: Welding parameters
- 3.3.6 Control panel: Weld history
- 3.3.7 Control panel: Info view
- 3.3.8 Control panel: Device settings
- 3.3.9 Control panel: Applying welding programs
- 3.3.10 Control panel: Weld data view
- 3.4 Additional guidance to functions and features
- 3.5 Pulse welding
- 3.6 Wireless connection (WLAN)
- 3.7 Using remote control
- 3.8 Changing welding polarity
- 3.9 Lifting equipment
- 4. Maintenance
- 5. Technical data

Master M 358
Operating manual - EN
3. OPERATION
Before using the equipment, ensure that all the necessary installation actions have been completed according to your
equipment setup and instructions.
Welding is forbidden in places where there is an immediate fire or explosion hazard!
The wire feed cabinet hatch must be kept closed when welding.
Check that there is enough space for cooling air circulation in the machine vicinity.
If the welding equipment is left unused for a longer period, disconnect the mains plug from the mains.
Always check before use that shielding gas hose, earth return cable and clamp and mains cable are in serviceable
condition. Ensure that the connectors are correctly fastened. Loose connectors can impair welding performance and
damage connectors.
© Kemppi
32
1921980 / 2242