
Instruction Manual
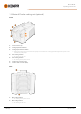
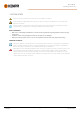
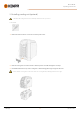
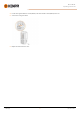
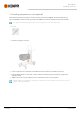
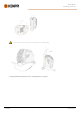
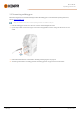
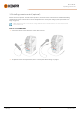
Table Of Contents
- 1. General
- 2. Installation
- 2.1 Installing power source mains plug
- 2.2 Installing cooling unit (optional)
- 2.3 Installing equipment on cart (optional)
- 2.4 Connecting welding gun
- 2.5 Installing earth return cable
- 2.6 Installing remote control (optional)
- 2.7 Installing and replacing feed rolls
- 2.8 Installing and replacing wire guide tubes
- 2.9 Installing and changing wire
- 2.10 Installing gas bottle and testing gas flow
- 2.11 How to get welding programs
- 3. Operation
- 3.1 Preparing welding system for use
- 3.2 Calibrating welding cable
- 3.3 Using control panel
- 3.3.1 Control panel: Home view
- 3.3.2 Control panel: Weld Assist
- 3.3.3 Control panel: Channels
- 3.3.4 Control panel: WPS view
- 3.3.5 Control panel: Welding parameters
- 3.3.6 Control panel: Weld history
- 3.3.7 Control panel: Info view
- 3.3.8 Control panel: Device settings
- 3.3.9 Control panel: Applying welding programs
- 3.3.10 Control panel: Weld data view
- 3.4 Additional guidance to functions and features
- 3.5 Pulse welding
- 3.6 Wireless connection (WLAN)
- 3.7 Using remote control
- 3.8 Changing welding polarity
- 3.9 Lifting equipment
- 4. Maintenance
- 5. Technical data

Master M 358
Operating manual - EN
2.3 Installing equipment on cart (optional)
Master M has four transport unit options: a 4-wheel cart with a gas bottle rack (P45MT), a 4-wheel cart without a gas
bottle rack (P43MT), a 2-wheel cart with a gas bottle rack (T25MT) and a 2-wheel cart without a gas bottle rack (T35A).
The equipment installation principle and the bottom securing interface is the same with all carts.
Tools needed:
1. Install the cooling unit on the cart.
2. Fix the cooling unit to the cart with two screws (M5x12) in the front and two screws (M5x12) in the rear.
3. Install the Master M device on top of the cooling unit. Refer to "Installing cooling unit (optional)" on page14 for
installation details.
4. T25MT 2-wheel cart:Secure the equipment to the cart with the two side connection brackets.
With the T25MT cart, an additional securing bracket is attached to the device handle. Secure the bracket to the cart
with the screws provided (M8x16) .
© Kemppi
16
1921980 / 2242