
Operation Manual


EN
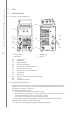
Connecting welding and earthing cables
The power source has two welding cable and control cable connectors. With them, the
welding robot's welding torch and, if necessary, a manual welding torch for tack welding can
be connected to the power source.
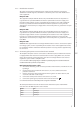
Connect the welding and earthing cables as follows.
1. Connect the power source to the electric network according to the instructions above.
2. Connect the earthing cable to the earthing connector A6.
3. Connect the welding cable to the welding current connector A5.
NOTE! Do not overload the welding cables, as an overload may cause voltage loss and
overheating.
You can conect the control cables of manual welding wire feeders or the control cable of a
remote controller to the control cable connectors.
Before starting the welding, connect the earth clamp directly to the work piece in such a way
as to maximise the contact surface of the clamp. The point of connection must be unpainted
and free of corrosion.
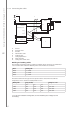
2.1.6 Installing the eld bus card
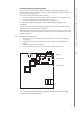
1. Remove the cover of the control unit on top of the power source by unscrewing the
cover screws.
2. Put the eld bus card on top of the interface card and attach with two M3 nuts (see
image).
3. Put the control unit cover back in place.
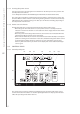
4. Connect the welding robot's eld bus cable to the control unit connector.
M3 nuts
Field bus card
Interface card
NOTE! Separate the eld bus cable for the welding robot from the mains cables, as they may
interfere with the control logic operation.
7
KempArc SYN 300, 400, 500, DT 400 / © Kemppi Oy / 1117