Virtual LoadMaster for Microsoft Hyper-V Installation Guide Virtual LoadMaster for Microsoft Hyper-V for Windows 2008 R2 Installation Guide VERSION: 1.15 UPDATED: MAY 2014 Copyright © 2002 - 2014 KEMP Technologies, Inc. All Rights Reserved.
Virtual LoadMaster for Microsoft Hyper-V Installation Guide Copyright Notices Copyright © 2002-2014 KEMP Technologies, Inc.. All rights reserved.. KEMP Technologies and the KEMP Technologies logo are registered trademarks of KEMP Technologies, Inc.. KEMP Technologies, Inc. reserves all ownership rights for the LoadMaster product line including software and documentation. The use of the LoadMaster Exchange appliance is subject to the license agreement.
Virtual LoadMaster for Microsoft Hyper-V Installation Guide Redistribution and use in source and binary forms are permitted provided that the above copyright notice and this paragraph are duplicated in all such forms and that any documentation, advertising materials, and other materials related to such distribution and use acknowledge that the software was developed by the University of California, Berkeley.
Virtual LoadMaster for Microsoft Hyper-V Installation Guide Table of Contents 1 Introduction .................................................................................................................................... 5 2 Installing Virtual LoadMaster (VLM) using Hyper-V Manager ........................................................ 6 3 4 2.1 Download the Hyper-V Files ................................................................................................... 6 2.
Virtual LoadMaster for Microsoft Hyper-V Installation Guide 1 Introduction The KEMP Virtual LoadMaster is a version of the LoadMaster that runs as a virtual machine within a hypervisor and can provide all the features and functions of a hardware-based LoadMaster. This document describes the installation of the Virtual LoadMaster (VLM) within a Microsoft Hyper-V environment. The VLM has been tested with Windows Server 2008 R2, Windows Server 2012 and Windows 8.
Virtual LoadMaster for Microsoft Hyper-V Installation Guide 2 Installing Virtual LoadMaster (VLM) using Hyper-V Manager The following instructions describe how to install a Virtual LoadMaster on a Hyper-V environment using the Hyper-V Manager. 2.1 Download the Hyper-V Files The VLM is packaged within a .vhd file for ease of deployment. This file can be freely downloaded from KEMP Technologies for a 30 day evaluation period. To download the VLM please follow the instructions below: 1.
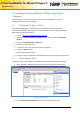
Virtual LoadMaster for Microsoft Hyper-V Installation Guide Figure 2-2: Import Virtual Machine 3. Select the Copy the virtual machine (create a new unique ID) option. 4. Select the Duplicate all files so the same virtual machines can be imported again check box. If this is the first Virtual Machine being imported you can select this check box. If it is not the first Virtual Machine being imported, please do not select this check box. 5.
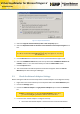
Virtual LoadMaster for Microsoft Hyper-V Installation Guide Expand the Network Adapter menu and Select the Static option within the MAC address section and enter the relevant MAC address. Ensure that the Enable spoofing of MAC addresses checkbox is selected. Figure 2-3: Network Adapter settings 5. Click on the OK button. 6. Repeat these steps for the second network adapter. Jumbo frames are supported for Hyper-V network synthetic drivers. 2.
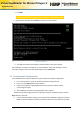
Virtual LoadMaster for Microsoft Hyper-V Installation Guide 2. Click Start. The VLM should begin to boot up. 3. Right-click the VLM and select Connect to open the console window. Figure 2-4: IP address 4. The VLM should obtain an IP address via DHCP. Make a note of this address. If the VLM does not obtain an IP address, or if the IP address needs to be changed, it can be manually configured in the console by following the steps in Section 3.1. 2.
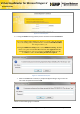
Virtual LoadMaster for Microsoft Hyper-V Installation Guide Figure 2-5: License Required 6. If using the Online licensing method, fill out the fields and click License Now. If you are starting with a trial license, there is no need to enter an Order ID. If you are starting with a permanent license, enter the KEMP Order ID# if this was provided to you. If using the Offline Licensing method, select Offline Licensing, obtain the license text, paste it into the License field and click Apply License.
Virtual LoadMaster for Microsoft Hyper-V Installation Guide lb100 login: bal Password: 1fourall 8. The Change Password screen appears 9. Enter a new password for the bal user in the Password input field and retype it in the Retype Password input field. 10. The login screen appears again, enter the bal user name and the new password as defined in the previous step. 11. In the screen informing that the password has changed, click the Continue button 12.
Virtual LoadMaster for Microsoft Hyper-V Installation Guide 17. In the Network Interface 0 screen, enter the IP address of the eth0 interface, the network facing interface of the LoadMaster, in the Interface Address input field. 18. Click on the Set Address button 19. Click on the eth1 menu option within the Interfaces section 20. In the Network Interface 1 screen, enter the IP address of the eth1 interface, the farmside interface of the LoadMaster, in the Interface Address input field. 21.
Virtual LoadMaster for Microsoft Hyper-V Installation Guide 31. In the DNS configuration screen, enter the IP address of the default gateway into the IPv4 Default Gateway Address input field. 32. If you have an IPv6 Default Gateway, please enter the value in the IPv6 Default Gateway Address input field. 33. Click on the Set IPv4 Default Gateway button. The LoadMaster is now fully installed and ready to be used.
Virtual LoadMaster for Microsoft Hyper-V Installation Guide 3 Troubleshooting 3.1 Cannot access the Web User Interface If a connection to the WUI cannot be established, network settings can be configured via the console view. 1. Login into the VLM via the console using the settings: lb100 login: bal Password: 1fourall Figure 3-1: Enter IP address 2.
Virtual LoadMaster for Microsoft Hyper-V Installation Guide Figure 3-3: Nameserver IP addresses 4. Enter a space-separated list of nameserver IP addresses. 5. A message will appear asking to continue licensing via the WUI. Try to access the IP address via a web browser. Ensure to enter https:// before the IP address. 6. Contact the local KEMP Customer Services Representative for further support if needed. 3.
Virtual LoadMaster for Microsoft Hyper-V Installation Guide 3. 4. 5. 6. 7. 3.5 Select the current host from the list for migration. Click Yes to the prompt asking if you want to make the Virtual Machine highly available. The path can be changed if needed. Click Next. Select the network and click Move. Wait for the migration to complete. Factory Reset If you perform a factory reset on the VLM, all configuration data, including the VLM’s IP address is deleted.
Virtual LoadMaster for Microsoft Hyper-V Installation Guide 4 References Unless otherwise specified, the below documents can be found at http://www.kemptechnologies.com/documentation Microsoft Hyper-V – Windows Server 2012 and Windows 8, Installation Guide Licensing, Feature Description Copyright © 2002 - 2014 KEMP Technologies, Inc. All Rights Reserved.
Virtual LoadMaster for Microsoft Hyper-V Installation Guide Document History Date Change Reason for Change Version Resp. Jun 2012 Initial draft Initial draft of the document 1.0 DD Aug 2012 Updates made Support for non-legacy drivers 1.1 DD Nov 2012 Updates made EULA screen update 1.2 DD Nov 2012 Updates Made Introduction of VLM-DE product 1.3 DD Jan 2013 Minor Updates made As per 6.0-42 updates 1.4 DD Mar 2013 Correction made Incorrect reference 1.