
Installation Guide
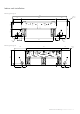

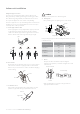

c. Positioning the indoor unit:
Remove the spacer.
Hook the indoor unit onto the upper portion of the mounting
plate (engage the hooks of the mounting plate into the
openings at the rear top of the indoor unit). Ensure that the
hooks are properly seated on the mounting plate by moving
the indoor unit in all directions.
upper hook
mounting plate
spacer
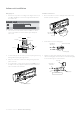
Press the lower left and right sides of the unit against the
mounting plate until the hooks engage into their slots
(clicking sound).
upper hook
connecting
cable
fixing lower hook
mounting plate
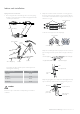
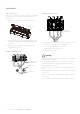
Piping connection - outdoor unit
a. Align the centres of the pipes and sufficiently tighten the flare
nut with your hands.
b. Then, tighten the flare nut with torque wrench until the
wrench clicks.
outdoor unit
2-way
valve
3-way
valve
discharge pipe
(suction pipe for
KSV53HRE and
KSV62HRE)
suction pipe
(discharge pipe
for KSV53HRE
and KSV62HRE)
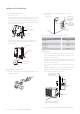
Make sure to follow the torque table value as below:
Outer diameter (mm) Torque (N.m)
6.35 (1/4”)
15-16
9.52 (3/8”)
31-32
12.70 (1/2”)
40-41
15.88 (5/8”)
45-46
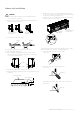
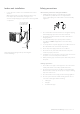
Piping formation
a. Form the piping by wrapping the connecting portion of the
indoor unit with insulation material and secure it with narrow
vinyl tape and wide vinyl tape.
If you want to connect an additional drain hose, the end of the
drain hose outlet should be routed above the ground. Secure
the drain hose appropriately.
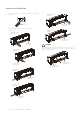
b. In cases where the outdoor unit is installed below the indoor
unit level:
Wrap the piping, drain hose and connecting cable from the
bottom to the top. Secure the wrapped piping along the
exterior wall using saddle or equivalent.
seal small openings
around piping with
a gum type sealer
wrapping
pipe
drain hose
trap is required to prevent water
from entering electrical parts
drain hose
connection cable
Note: all piping must be protected against mechanical damage.
18 Installation instructions Kelvinator Air Conditioning
Indoor unit installation