
Assembly Instructions


ASSEMBLY INSTRUCTIONS SHEET
* Do not discard any of packaging until you have verified that you have all parts and pack of fittings.
* Keep children away during assembly and operation.This item contains small parts which can be swallowed by children.
* Retain the assembly instructions for future reference.
Part list:
NO. Parts Qty. NO. Hardware Qty.
A(A1&A2) Top Mesh Ball 2 T1 Bolt (1/4"x5/8") 6
B(B1&B2) Bottom Mesh Ball 2 T2 Bolt (1/4"x 3/4") 10
C Log Grate 1 T3 Bolt (1/4"x1-3/4") 2
D Fire Bowl 1 U Washer 24
ELeg 3 VNut 18
F1
Large Handle (front
handle)
1 X Allen Key 1
Prior to assembly, please read these instructions carefully. We suggest you carry out assembly on a soft surface so as to avoid scratching the paint.
For all cast iron products,please note that because of the nature of cast metal, you may find roughness on the surface. This enhances the beauty of
the product and is not a defect.
)
F2
Small Handle (Side
handle)
2 Y Wrench 1
G Connection piece 6 Z Poker 1
H: Raincover 1
Assembly Instructions:
Tool required: Allen key(X), Wrench (Y) provided in package.
DO NOT FULLY TIGHTEN THE BOLTS BEFORE ASSEMBLING ALL OF THE LEG FRAMES.
Prior to assembly, please read these instructions carefully. We suggest you carry
out assembly on a soft surface so as to avoid scratching the paint.
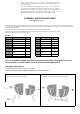
Step 1: Assemble 3 x Legs (E) to Bottom Mesh Ball (B1&B2)
with 6 x Bolts(T1), each legs use 2 x Bolt (T1).
Step 2: Assemble Bottom Mesh Ball (B1&B2) with 6 x Bolt (T2),
3 x connection pieces (G), 6 x Washer (U)and 6 x Nut (V).
Flaming Ball Fire Pit
period. Before we can help, you will need to provide proof of purchase with the
our contact us page.
Thank you for choosing us. If you have any questions, comments or
new parts, or replace products at our discretion within the one year warranty
We stand behind our brand and the quality of the items we sell. We will send
photos to determine the cause of defect and for future quality control.
concerns please feel free to contact us by phone or you couldalso email us via
date of purchase and photos of the defective merchandise. We will use the