Model 4299-9 Dual Fixed Rack-Mount Kit Keithley Instruments, Inc. 28775 Aurora Road Cleveland, Ohio 44139 1-888-KEITHLEY http://www.keithley.com Assembly and Mounting Instructions Introduction The Model 4299-9 Dual Fixed Rack-Mount Kit for 2U Graphical Display Instruments contains all the hardware to install two adjacent 2U Graphical Display instruments in a standard 19-inch equipment rack. 1U is a standard vertical spacing that is equal to 1.75 inches (about 4.45 cm).
Model 4299-9 Dual Fixed Rack-Mount Kit Parts list The following figure shows the hardware that is supplied with this kit. The following table lists the hardware, part number, and quantity.
Model 4299-9 Dual Fixed Rack-Mount Kit Installation To install two Graphical Display instruments using the Model 4299-9 Dual Fixed Rack-Mount Kit: 1. Review the installation precautions (on page 3). 2. Select a location in the rack. 3. Take steps to make it easier to manipulate and install the Graphical Display instrument: • Clear as much space as possible around the selected rack location • If practical, remove the cabinet sides from the rack 1.
Model 4299-9 Dual Fixed Rack-Mount Kit Step 1: Prepare the rack To prepare the rack for installation, install the cage nuts and the support shelf for the selected location. To install the cage nuts on the rack rails: 1. Using the front-rack ear (2450-360) as a guide, mark holes for the selected installation location (four places total, two for each rail). 2. Install the cage nuts (1) in the backside of each rail hole (2) where marked in step 1.
Model 4299-9 Dual Fixed Rack-Mount Kit To install the support shelfs in the rack: 1. Align the first support shelf (1) with the installed cage nuts (2). 2. Secure the support shelf (1) with 10-32 x 1/2" screws (3) and nuts (4) as shown (four places). 3. Repeat steps 1 and 2 on the other side of the rack to install the second support shelf (1).
Model 4299-9 Dual Fixed Rack-Mount Kit Step 2: Prepare the instrument To prepare a Graphical Display instrument for rack mounting, remove the handle and bumpers (if installed), and then install the mounting hardware. Remove handle and bumpers from the Graphical Display instrument To remove the handle and bumpers (if installed): 1. While pulling the ends of the handle (1) away from the sides of the instrument, swing the handle to the upright position (the upright position is illustrated in the figure). 2.
Model 4299-9 Dual Fixed Rack-Mount Kit To install the mounting hardware on the instruments: 1. Place the instruments side-by-side (see figure). 2. Secure a front-rack ear (1) to each instrument using two 6-32 x 5/8" pan head screws (2) as shown in the figure. 3. Orient the hinges so that the knuckles are toward the front of the instruments. 4. Secure one-half of the hinge (3) to the right instrument with two 6-32 x 7/16" flat head screws (4). 5.
Model 4299-9 Dual Fixed Rack-Mount Kit 6. Set the instruments next to each other. 7. Secure them together by inserting the pin (5).
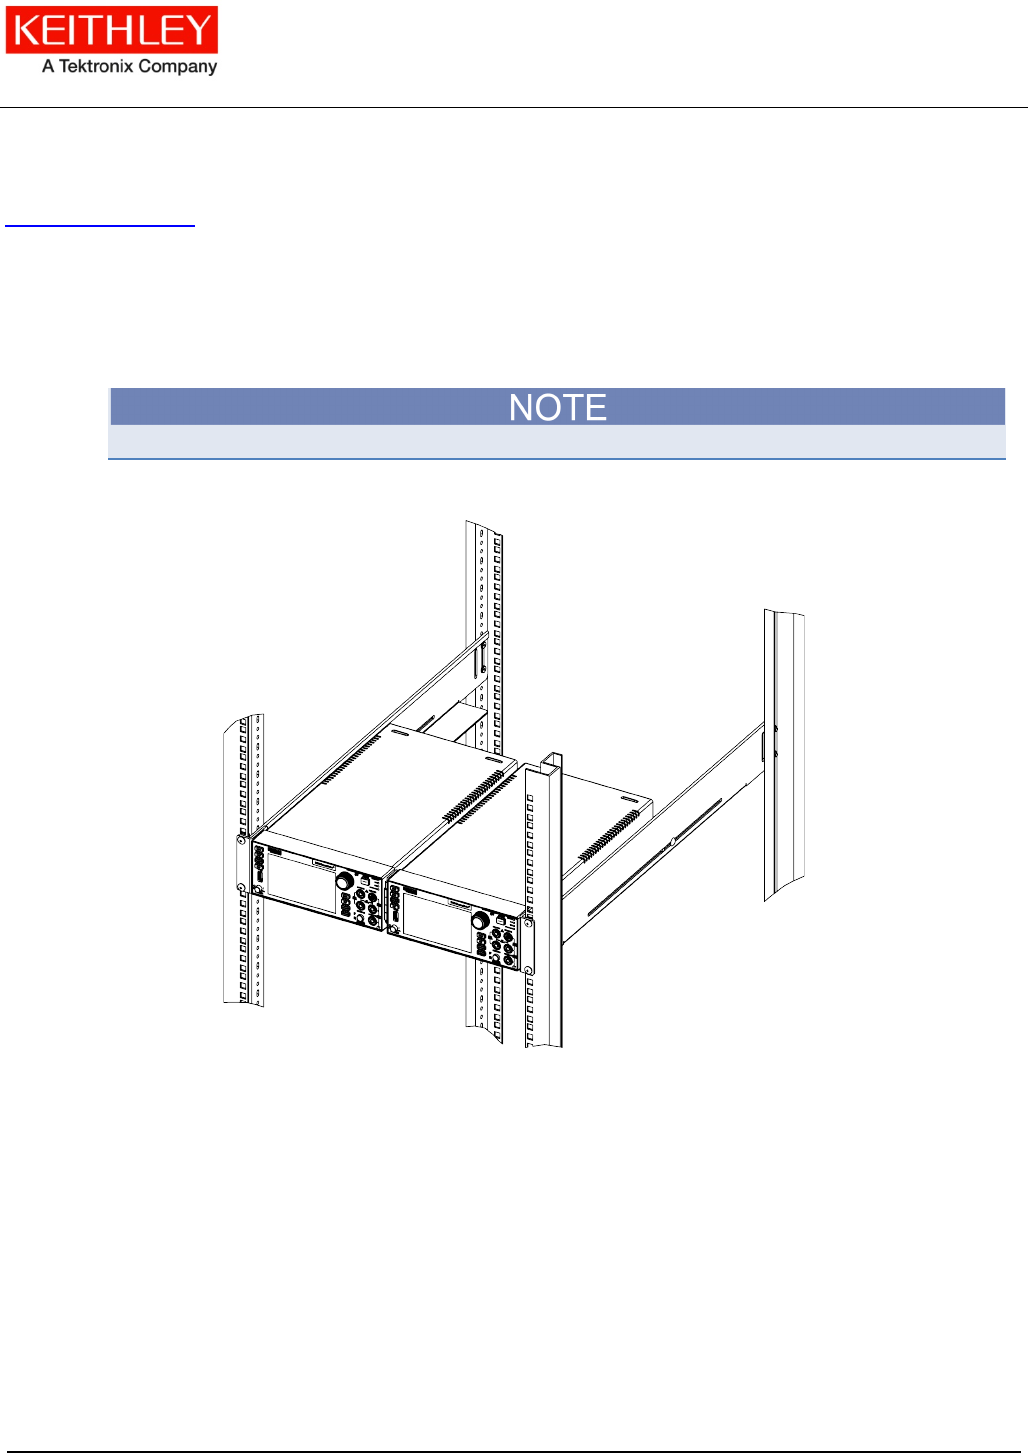
Model 4299-9 Dual Fixed Rack-Mount Kit Step 3. Install the instrument assembly To install the Graphical Display instrument assembly in the rack: 1. Place the Graphical Display instrument assembly (1) in the rack and on the support shelves (2). Keep supporting the instrument assembly until it is secured. 2. Check that the instrument assembly (1) is fully seated against the front rack rails against the front rack rails. 3. Secure the instrument assembly (1) using 10-32 x 5/8" screws (3) (four places).
Model 4299-9 Dual Fixed Rack-Mount Kit 4. Place the shelf clip (1) on the shelf (2) and lightly secure it with the carriage bolt (3) and nut (4). 5. Slide the shelf clip (1) toward the instrument and then fully tighten the nut (4). 6. Repeat steps 4 and 5 to install the shelf clip for the other instrument.
Safety precautions The following safety precautions should be observed before using this product and any associated instrumentation. Although some instruments and accessories would normally be used with nonhazardous voltages, there are situations where hazardous conditions may be present. This product is intended for use by qualified personnel who recognize shock hazards and are familiar with the safety precautions required to avoid possible injury.
The CAUTION heading in the user documentation explains hazards that could damage the instrument. Such damage may invalidate the warranty. Instrumentation and accessories shall not be connected to humans. Before performing any maintenance, disconnect the line cord and all test cables. To maintain protection from electric shock and fire, replacement components in mains circuits — including the power transformer, test leads, and input jacks — must be purchased from Keithley Instruments.