
User Manual

Model 3760
10-Channel High Current Multiplexer Card User's Manual Section 2:
Installation and connections
3760-900-01 Rev. A / July 2017 2-3
Card installation
Slot covers must be installed on unused slots to prevent personal contact with high voltage
circuits. Failure to recognize and observe standard safety precautions could result in
personal injury or death due to electric shock.
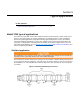
Perform the following steps to install a switching card into the instrument mainframe:
1. Turn the instrument off and disconnect the power line cord and any other cables connected to the
rear panel.
2. Position the instrument so that you are facing the rear panel.
3. Remove the slot cover plate from the desired mainframe slot. Retain the plate and screws for
future use.
4. With the top cover of the switching card facing up, align the card's edge into the slot's card guide
and slide in the card. For the last ¼ inch or so, press in firmly to mate the card connector to the
mainframe connector.
5. On each side of the card, there is a mounting screw. Tighten these two screws to secure the card
to the mainframe. Do not overtighten.
6. Reconnect the power line cable and any other cables to the rear panel, then turn the instrument
on.
7. Press the SLOT key to see the model numbers, description, and the firmware revision of the
installed switching cards, along with the mainframe firmware and DMM (if present).
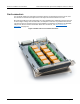
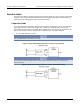
Item shipped may vary from model pictured here.
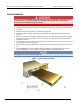
Figure 3: Typical module installation