
User manual


Front Panel Operation
2001-900-01 Rev. K/ August 2010 3-81
is aborted.) Selecting burst mode makes these temporary
changes:
• Triggers are idled between bursts.
• Autoranging is disabled.
• Autozero is disabled.
• Integration time is set to 0.01 PLC (167µsec).
• Resolution is fixed at 4.5 digits.
• Buffer data group is set to compact.
• Buffer control is set to fill-and-stop.
NOTE
Some instrument settings allowed in burst
mode, such as a trigger event source of
timer in the measure layer, may affect the
acquisition speed of 2000 readings/
second.
Enabling burst mode
Once burst mode is enabled, the instrument is dedicated to
that purpose. Other than setting the buffer size, you cannot
change any configuration parameters until burst mode is
aborted. Burst mode is enabled through the CONFIG DATA
STORE menu, as follows:
1. Configure the instrument’s function, range, and trigger-
ing to be compatible with burst mode.
2. Display the CONFIG DATA STORE menu by pressing
the CONFIG key and then STORE. The following menu
is displayed:
CONFIG DATA STORE
BURST-MODE DATA-GROUP CONTROL
CLEAR-ALL COUNT FEED
3. Use the cursor keys ( and ) to highlight BURST-
MODE and press ENTER. After a message about the
enabling of burst mode clearing the buffer, the display
reads:
BURST MODE
OFF ON
4. Select ON and press ENTER. If the instrument configu-
ration is compatible with burst mode, this action puts the
unit into idle, and takes it out of autorange. The follow-
ing typical message is shown:
BURST:00100 READINGS
NOTE
If the error message “Settings conflict” is
displayed, the configuration of the instru-
ment is incompatible with burst mode.
The configuration must be changed to use
burst mode.
5. Use the cursor and RANGE and keys to choose
the buffer size. Press ENTER when done to view the fol-
lowing typical message:
00100 READING BURST
Use TRIG to start; EXIT to abort
Burst mode operation
Table 3-32 details the sequence of steps during burst mode.
The steps assume just one burst of readings before aborting
the burst mode, but you are able to initiate more than one
burst, each time overwriting the previously stored readings.
As can be seen from the table, a front panel trigger starts the
burst acquisition. The Model 2001 remains looping in the
measure layer of the trigger model until the requested
number of readings is acquired. To enhance burst acquisition
speed, the front panel is not updated until the raw readings
are being post-processed.
Meter Complete output pulses are sent at the rate of 2kHz
during the acquisition phase. (Note: The last one is not sent
until post-processing is done.)
After the acquisition phase, the unit returns to the idle state
and starts post-processing, which consists of converting the
raw readings into measurements by applying the calibration
constants. During the post- processing phase, the front panel
“*” annunciator is lit.
The acquisition phase of burst mode can be aborted by
pressing the EXIT key. Then the Model 2001 starts post-
processing on that portion of the reading buffer.
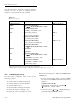
q~ÄäÉ=PJPO
Available functions in burst mode
Function Type
DC voltage
AC voltage
DC current
AC current
2-wire resistance
Normal
RMS, average
Normal
RMS, average
Normal