
Product Manual

4.2 Squaring 4.2
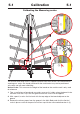
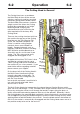
Adjusting the Squareness
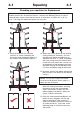
NOTE: Before making any adjustments carry out the squareness check as described on
the previous page.
It is assumed that the board used for the test is still clamped in the machine. From the
test results determine if the last cut made in the top of the board is to the left or right of
the previous cut, as shown above:
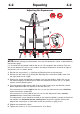
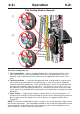
1. Slacken the two screws(1 + 4) joining the Squaring Arm to the two Legs.
2. Slacken the left hand nut (2) joining the Squaring Arm to the Main Body, make sure
the right hand nut (3) is tight.
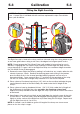
3. Release the clamp and position the board such that the blade is held in the cut on
the bottom edge of the board, press down on the board to make sure it is in good
contact with the Squaring Arm.
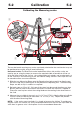
4. Turn the squaring adjustment knob (5) on the right hand Leg in the direction shown
below dependant upon the position of the top two cuts.
If the second cut is to the
right of the first cut turn the adjustment screw clockwise
when viewed from underneath.
If the second cut is to the
left of the first cut turn the adjustment screw counter-
clockwise
when viewed from underneath.
The adjustment screw should be moved so that when the blade is moved to the top of
the board it cuts
between the two existing cuts, the plastic sightline fixed to the
edge of the clamp gives an indication where the machine is going to cut.
5. Repeat the squareness check.
6. Tighten the screws (1,2, & 4) nut loosened in 1& 2 above.
2 3
5
1 4