
Product Manual

n MAINTENANCE
Your matcutter is a precision made machine and will give many years of accurate and reliable service if you follow
these few simple steps.
Keep all liquids ( including tea and cof
fee) away from the machine - spillages spoil the machines performance and
mats cut upon it.
Dust/vacuum daily, for stubborn stains use detergent/ water mix firstly applied to a cloth.
Cover the machine overnight with a plastic or fabric sheet.
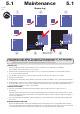
If you need to move the machine away from the bench when it is not in use, store it either flat or if you have to stand
it on end fasten the end of cut stop and use a strong elastic band to fix the cutter head to it. Then stand it on its top
end leaning against a stable support.
Please note:- Standing the matcutter on end should be avoided if possible but, providing it is done carefully no harm
will come to it.
In the event of heavy soiling on any part of the machine solvents can be used for cleaning but:-
Apply the solvent to a cloth and not directly on the matcutter.
Read and comply with the solvents safety instructions.
Do not allow solvent to come in contact with any printed or plastic parts of the machine.
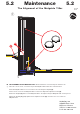
n CLEANING AND LUBRICATION OF THE CUTTER BAR
As above, clean the two guide bars using solvent on a cloth being careful not to get solvent on the measuring scale.
Lubricate using petroleum jelly or a firm grease, again apply it to a cloth then wipe it along the guide bars. Do not
apply too much gr
ease a thin smear is all that is required.
Oil can be used lightly on the lift and hold, pivot lift arm hinges and cutter bar pivots.
FAULT
Frayed mount
surface
Over or
undercuts in
some corners
only
Machine starts
to undercut
without
apparent
changes
Distortions at
start of cut
(Hooking)
Blade not
cutting through
on the last cut
FAULT
Blade not
cutting through
consistently
Erratic
cutter head
movement
Cut line not
straight
Matboard not
cutting through
in centre of
the cut
Matboard not
clamping
CAUSES AND SUGGESTIONS
Change blade
Replace slipmat
Matboard out of square
Apply even hand pressure on
cutter head
Check blade type
Matboard not the same texture
Worn slip mat
Change the blade
Check under cutter bar for tape
or offcuts
Adjust for any adhesive tape
thickness on the mat
Check blade type
Blade set too deep
Change blade (worn)
Avoid any hand pressure on handle
Sideplay in cutter head - adjust
Do not release the start of cut finger
until the blade has fully penetrated
the mat
Check blade type
Worn blade
CAUSES AND SUGGESTIONS
Change blade
Adjust blade depth
Avoid any pressure on handle
Check blade type
Clean and lubricate cutter bar as per
instructions
Change blade
Uneven hand pressure on bevel
blade holder
Check blade type
Apply no pressure to the handle
Blade too thin for the mat
Check blade type
Avoid putting any pressure on the handle
when cutting as it causes the cutter bar to
curve up in the middle which affects the
line of cut and clamping
Check clearance between the handle and
the lift hold.
Check rubber grip strip under cutter bar.
Check under cutter bar for tape or offcuts
IMPORTANT At the first sign of any cutting defect change the blade.
Do not adjust blade depth before changing the blade.
8.1
Fault finding
8.1
MyBinding.com
5500 NE Moore Court
Hillsboro, OR 97124
Toll Free: 1-800-944-4573
Local: 503-640-5920