
Product Manual

5.3 Calibration 5.3
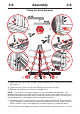
Fitting the Sight-line strip
The Sight-line strip is fixed to the clamp and then trimmed using the cutting blade to give
an accurate guide when cutting to trim lines, the edge of an image or pencil marks.
NOTE: Do not engage the Twin Wheel Cutter until reading its instructions for use in
Section 6. Engaging the Twin Wheel Cutter interferes with the Sight-line Strip and can
cause damage to it. A gap is left in the Sight-line Strip at a convenient height to enable
the Twin Wheel Cutter to be engaged.
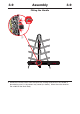
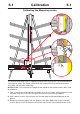
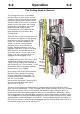
1. Remove the worn Sight-line Strip by peeling it off and clean any surplus adhesive with
solvent cleaner on a cloth. Remove the backing paper and starting at the bottom
press the Strip firmly in the channel provided working upwards and cut off at a
convenient height. Leave a gap of 18cm (7”) and then fit the remainder of the strip.
For the 210 version one full length Strip and one cut in half will be required.
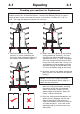
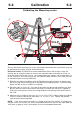
2. Place a piece of firm board up to 6mm (1/4") thick on the machine to bridge the gap
running down the back of the Main Body, this needs to be the full height of the
clamp.
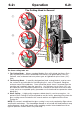
3. Place a piece of card or foamboard 3-6mm (1/8"-1/4") thick under the full length of
the flexible part of the Sight-line strip,
not under the aluminium clamp itself.
Depress the clamp handle so that the Sight-line strip is pressed flat across the surface
of the board.
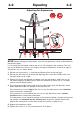
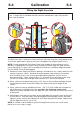
4. Keep fingers clear and using a block or tool hold down the top left corner of the strip
to start the cut. With the turret rachet disengaged (Scoring page 6) press the blade
lightly on to the surface of the Sight-line strip score along the full length. Repeat and
trim the Sight-line strip in 2 or 3 cuts.
NOTE: If a board is not available to go the full length of the clamp use two or more
pieces or trim the strip in stages.
NOTE: The Sightline Strip is fitted to your machine but may wear or get marked with
use. A spare strip is included with the machine, replacement strips are available
from your distributor.
1
3
4
2