
User guide

A D V A N C E D A P P L I C A T I O N S E T T I N G S
159
5. In the Control Instant Messaging window that opens, check the Enable control box.
6. On the Allowed and Blocked tabs, create lists of allowed and blocked contacts.
7. In the Action dropdown list, select the default action for contacts not included in your lists.
You can also allow or block communication with the contact you have selected from the report on events for that
account.
To view the report:
1. Open the main application window.
2. Select the Web Policy Management section in the left part of the window.
3. Click the Report button in the right part of the window.
In the window that opens, in the Messaging section, select the Instant messaging component.
The window displays a report on the user's instant messaging activity.
COMMUNICATING VIA SOCIAL NETWORKS
Controlling communication via social networks consists in controlling contacts allowed for communication and message
logs. You can create lists of allowed and blocked contacts, specify key words (see section "Key words search" on
page 160) that all incoming messages will be checked for, and enter private data (see section "Sending confidential
information" on page 160) that are prohibited to be sent.
If communication with a contact is blocked, all messages addressed to this contact or received from it will be filtered out.
Information about blocked messages and key words encountered in them is displayed in a report. In the full report you
can see messaging history for each contact.
Some social networks, such as Twitter, use the encrypted connections. To scan the traffic generated by those networks,
you should enable the scan of encrypted connections (see page 133).
The current version of Web Policy Management ensures control over instant messaging in the following social networks:
Facebook;
Twitter;
MySpace.
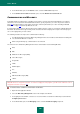
To restrict contacts available for communication via social networks:
1. Open the main application window.
2. Select the Web Policy Management section in the left part of the window.
3. In the right part of the window, select the user account on which a restriction should be imposed, and click the
Configure policies button.
4. In the window that opens, in the Messaging section, select the Social Networking component.
5. In the Control Social Networking window that opens, check the Enable control box.
6. In the Action dropdown list, select the default action for contacts not included in your lists.