
User Guide


HIERARCHY of Administration Servers 67
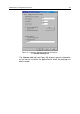
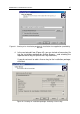
• proxy server settings – To specify the settings, click the Set-
tings button and enter the proxy server address, user login and
password. To enable connection via the proxy server, select the
Use proxy server checkbox.
After the Network Agent is installed, you can change the connection
settings using policies and application settings.
When you reinstall the Network Agent on a client, the
connection settings and Administration Server certificate are
automatically updated.
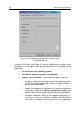
• A folder in the Unassigned group to which new computers will be
added after the installation of the Network Agent – in the Default
group name fields. You can select one of the following variants:
• Use Windows domain name – The client will be added to a
folder that corresponds to its current location on the Windows
network: domain or user group (this is the default option).
• Define group name – The client will be added to the specified
folder. Enter the name of the folder in the field below. If the Un-
assigned group has no folder with this name, it will be created
(you can also specify the name of the existing folder from the
Unassigned group).
After the Network Agent is installed, you will not be able to change
the name of the folder that will contain new computers added to the
Unassigned group. This setting cannot be changed using policies
or application settings.
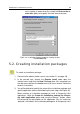
5.4. Creating an application
deployment task
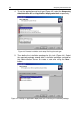
To create an global application deployment task:
1. Connect to the administration server (see section 2.1 on page 10).
2. Choose the Tasks node in the console tree and the New / Task item
on the shortcut menu or the Action menu to start the task creation
wizard. Follow the wizard’s instructions.
3. Specify the task name. If the name you have chosen already exists,
_1 will be automatically added to the end of the name.