
User Guide


HIERARCHY of Administration Servers 57
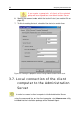
In order to configure settings used for connecting a slave server to the
main Administration Server,
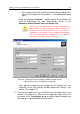
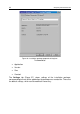
1. In the Administration Console, select the required Administration
Server, open the shortcut menu and select the Properties item. You
can also select this item on the Action menu. In the next dialog box,
select the Settings tab, where you should specify:
• Network address of the slave Administration Server
• Name of the slave Administration Server that will be displayed
on the master Server
• Certificate of the master Server
2. Click Apply or ОК. As the result, the slave Server will connect to the
master Server and retrieve all policies and tasks for the group to
which it is included.
3. The policies and tasks received from the master Server are displayed
on the slave Server in the following manner:
• The following icon will be displayed near the name of the policy
received from the master server –
(usual icon for policies – ).
• The
icon will indicate the policy settings locked on the master
Server (i.e. the settings that cannot be modified on the slave
Server).
• The following icon will be displayed near the name of a group
task received from the master Server –
(usual icon for tasks –
).
The policies and tasks received from a master Administration Server
cannot be modified on a slave Server.
Tasks received from a master Administration Server cannot be run or
started from a slave Server.
The status of the slave Administration Server displayed in the results pane of the
Administration Console on the master Server will change to Connected.