
User Guide


CHAPTER 4. HIERARCHY OF
ADMINISTRATION SERVERS
4.1. Connecting a slave
Administration Server to a
master Server
In order to add a slave Administration Server to the logical network:
1. Select the required administration group, open the shortcut menu and
select the New / Administration Server item. You can access the
same option on the Action menu. A wizard will start. Follow the
wizard’s instructions.
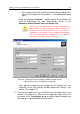
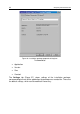
2. You will need to specify the name of the slave server. Enter it
manually. The new Administration Server will be displayed under this
name in the administration group. The name must be unique within
the same level of hierarchy.
3. In the next wizard’s box you can specify the network address of the
slave Administration server. After this, the master Administration
Server will send a command to connect the slave server and submit
all properties (network address of the master Server, name of the
slave server, certificate of the master Server).
If you do not want to specify the network address of the slave Server,
just click Next.
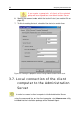
4. Specify the certificate of the slave Administration Server. Click
Browse and locate the certificate file.
After you finish with the wizards, the master Administration Server will add the
information about the slave Server to the database. The icon and name of the
new Server will be displayed in the Servers folder of the corresponding
administration group.