
User Guide


Viewing, creating, and configuring a logical network 31
The criteria for determining the status of the client computer are
configured in the setting of the previous hierarchy level group and will be
inherited by all groups of the logical network. In order to configure
individual criteria for a group, uncheck the Inherited box and configure the
settings.
The Security tab (see Figure 5) is designed to configure access rights tot
he administration group (see section 2.2 on page 14).
To view information about a logical network client:
Select the group in the Groups folder that includes the desired client. The
list of clients included in this group will be displayed in the details panel
(you can also expand the corresponding branch in the console tree).
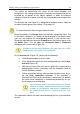
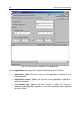
Select the required client and click Properties on the shortcut menu or on
the Action menu. This will open the <Computer name > Properties
dialog box with several tabs (Figure 18).
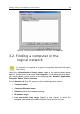
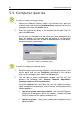
In order to find the client computer you need, you can use the
Find function (see section 3.2 on page 35).
On the General tab (Figure 18), you can do the following:
• View network properties of this client.
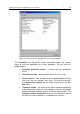
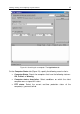
• View information about the client configuration by clicking Sys-
tem Info (Figure 19).
• Edit the host name (the host name is generally assigned by the
Administration Server; it coincides with the computer name on
the MS Windows network.
• Define connection settings with the administration server by us-
ing the Keep connection checkbox. If the checkbox is
checked, the client-server connection is permanent. By default,
the client-server connection is established periodically for syn-
chronizing or transmitting data.
Note that permanent connection should only be pro-
vided for the most important clients because the total
number of simultaneous connections supported by
the Administration Server is limited to several hun-
dred.
The information reflects the data received during the last synchronization
session.