KASPERSKY LAB DOrder for Microsoft Windows. Version 1.
DORDER FOR MICROSOFT WINDOWS. VERSION 1.0 User's Guide © Kaspersky Lab Ltd. Tel. (095)797-87-00 • Fax (095)797-87-00 http://www.kaspersky.
Contents 1. OVERVIEW OF DORDER 1.0 FOR MICROSOFT WINDOWS .............................5 1.1. Purpose and Functionality Overview................................................5 1.2. Scope of Use .................................................................................7 1.3. Technical Support ..........................................................................8 1.4. What You Can Find in This Guide ....................................................8 1.5. Document Conventions .................
K A S P E R S K Y L A B L T D . 6.2. Viewing the Keys ......................................................................... 44 7. GETTING INFORMATION ABOUT THE PROGRAM ..........................................46 8. CONFIGURING THE PROGRAM...................................................................47 8.1. Displaying the Configuration Menu................................................ 47 8.2. Changing the Program Login Password ......................................... 48 8.3.
Chapter 1. Overview of DOrder 1.0 for Microsoft Windows 1.1. Purpose and Functionality Overview The world-renowned developer and provider of information security software, Kaspersky Lab Ltd., distributes its products via distributors, dealers, and VARs (further in this guide—partners). With each copy of Kaspersky Lab’s software product, delivered by a partner to an end user, a unique key file (further in this guide—key) is enclosed. The keys are generated in the Kaspersky Lab Company.
K A S P E R S K Y L A B L T D . Each software product of Kaspersky Lab consists of a fixed list of programs. When buying a product, a user can order certain programs from this list. Only these programs will be included in the product delivered to the user (principle of configurable software solution; see the current product list of Kaspersky Lab). For each program included in the product, the number of licensed items (further in this guide—licenses) should be specified.
D O R D E R 1 . 0 3. Short waiting period for the order to be received and executed by Kaspersky Lab. The key delivery from Kaspersky Lab may take some time. Kaspersky Lab will generate the ordered keys and send them to you by email. 4. Ready key delivery from Kaspersky Lab by email. The generated keys are the files with .key extension attached to the email. You can order a set of keys for the selected programs of the product, which may be legally used in several installations of the product.
K A S P E R S K Y L A B L T D . 1.3. Technical Support Kaspersky Lab Ltd. provides free technical support by either phone or email to the partners who order keys using the DOrder program. If you encounter any problems during the DOrder installation or usage, please contact the technical support department of Kaspersky Lab Ltd., See Chapter 9. 1.4. What You Can Find in This Guide This document is intended to help you become familiar with the DOrder program.
Chapter 2. Installing and Uninstalling the DOrder Program 2.1. The Distribution Pack The DOrder distribution pack includes: • Program files (as zip archive) • This User’s Guide To work with the DOrder program, you also need the Calcue.csl file. This file is sent by email. 2.2. Hardware and Software Requirements To run DOrder, you must have certain hardware and software installed on your computer. The system requirements include: • Any IBM-compatible machine with Microsoft Windows version 9.
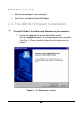
K A S P E R S K Y L A B L T D . • Ethernet card plugged in your computer; • Email client installed for Microsoft Windows 2.3. The DOrder program Installation To install DOrder 1.0 for Microsoft Windows on your machine: 1. Locate the setup.exe file on you distribution media. Run the setup.exe program. The setup program then launches (See Fig. 1). Please carefully follow the instructions on the screen. Figure 1.
I N S T A L L I N G A N D U N I N S T A L L I N G D O R D E R 2. After reading the message in the Welcome window, click the Ne xt button. The Cust omer I nf or mat i o n window appears on the screen (See Fig. 2). Figure 2. The Cu s t omer I nf or ma t i o n window 3. In the Us er Na me field, enter your name. In the Co mp an y Na me field, enter name of the company you work for. After filling in both the fields, click the Ne xt button.
K A S P E R S K Y L A B L T D . Figure 3. The Ch oo s e Dest i n at i on Lo c at i on window 4. In this window, select the folder for DOrder files installation. You can accept the default folder offered and click the Ne x t button immediately. Select another folder for the DOrder files. To change the default folder name: • Click the Br ow se button. In the displayed standard C hoo s e Fo l d er dialog, set the path to the folder you want DOrder to be installed. • Click the O K button.
I N S T A L L I N G A N D U N I N S T A L L I N G D O R D E R After clicking the Nex t button, the Se l ect Pr ogr a m F ol der window will be presented (Fig. 4). Figure 4. The Se l ect Pr o gr a m F ol der window 5. In the S el ec t Pr o gr a m Fo l der window, select a name for the DOrder menu command, which will be added to the Windows Programs menu. You can accept the name offered by default, enter a new name, or select an existing name. • If you choose the name set by default, click Next .
K A S P E R S K Y L A B L T D . After clicking the Ne xt button, the St ar t C op yi n g Fi le s window appears (Fig. 5). Figure 5. The St ar t C op yi n g Fil es window 6. Configuration of the setup parameters is now complete. In the St ar t Cop yi n g F il e s window, ensure that you have made all the settings correctly. If you want to change any settings, return to one of the windows described above by clicking the Ba c k button. If all the settings are correct, click Ne xt .
I N S T A L L I N G A N D U N I N S T A L L I N G D O R D E R gram from your computer, please see the item 1.4, then follow the setup steps described above. Figure 6. The Set up St at u s windows 7. The Set up St at u s window displays the file name currently being copied and the progress indicator showing the percentage of the setup process that has been completed. Please wait for the setup program to finish copying and configuring the program files.
K A S P E R S K Y L A B L T D . Figure 7. The Set up Co mp l et e window 8. Click the Fi n i s h button to end the installation and to quit the setup program. 2.4. Uninstalling the DOrder program To remove DOrder from your computer 1. Click the St ar t button on the Windows taskbar. 2. From the Windows menu, choose S et t i n gs . On the next menu, click Contr ol pa ne l. 3. In the Control panel window, double click the Ad d/ R e move Pr o gr a ms icon.
I N S T A L L I N G A N D U N I N S T A L L I N G D O R D E R 4. On the Ad d/ R em ove tab of the Add / Re mo ve Pr o gr a ms dialog, select K as per sk y La b Di st r i b ut i o n Ut i l it y and click the Ad d/ Re m ove ... button. 5. If you are sure you would like to remove DOrder, click Y es in the confirmation window. To cancel the program uninstalling, click No.
Chapter 3. DOrder Start and Initial Configuration 3.1. Registering and Setting Up the Program: Concepts To start working with DOrder, you should accomplish several tasks. Please register the DOrder program, and install the product list file. Normally, you do it once before the first start of DOrder. 3.1.1. Registering the Program The purpose of registration is to insert information about your installation in the internal database of Kaspersky Lab.
D O R D E R S T A R T A N D I N I T I A L C O N F I G U R A T I O N If the DOrder.sgn is lost, you will have to register again. It is recommended to create a backup copy of this file. The public key file is called DOrder.pub. After the registration, this file is sent to Kaspersky Lab, and is used later to check the signatures of your orders. You can start ordering keys with DOrder only after registration of your installation in the Kaspersky Lab database.
K A S P E R S K Y L A B L T D . 2. Click the command that opens the DOrder submenu. It is called Ka sp er s k y L a b D i st r i bu t i o n U t i lit y by default though you can change its name during the installation process, See item 2.3. In the DOrder submenu, click Kas p er s k y L a b Di str i bu t i on Ut i lit y. (Fig. 8). Figure 8.
D O R D E R S T A R T A N D I N I T I A L C O N F I G U R A T I O N 3.3. Registration at the First Start To register the DOrder program 1. Start the program as described in item 3.1. The Us er I nf or mat i on window (Fig. 9) appears. The window elements are described in the Table 2. Figure 9. The User I nf or mat i o n dialog 2. Enter your login name and password in the Ac co un t and Passw or d fields respectively. This name and password will be used later to start the program.
K A S P E R S K Y L A B L T D . If after clicking the OK button, the wrong password message appears on the screen, click O K in the error window. The U se r I nf or mat i o n dialog becomes active. Fill in the window fields as described above. Be careful when entering passwords; the Pa s sw or d and Co nf ir m P as sw or d fields should contain the same values. 4. Click the OK button. The window confirming the public key (See item 3.1) dispatch to Kaspersky Lab, appears on the screen (See Fig. 10).
D O R D E R S T A R T A N D I N I T I A L C O N F I G U R A T I O N If after clicking OK , the error message (Fig. 12.) is displayed; and after clicking O K in this window, the empty M ai n window is displayed, then you need to install the product list file on your computer, See item 3.4. If after clicking OK , the error message, stating that DOrder failed to send an email to Kaspersky Lab, is displayed, then you need to configure your email client, See item 8.3, 8.4.
K A S P E R S K Y L A B L T D . Figure 11. The email, confirming registration 3.4. Installing the Product List File If while running with DOrder you see the window presented in Fig. 12, you should install the product list file on your computer. Figure 12. The error message: The product list is not installed To install the product list from the file attached to the email 1. Start the email program and find the email from Kaspersky Lab with the Calcue.csl file attached.
D O R D E R S T A R T A N D I N I T I A L C O N F I G U R A T I O N 2. Click the attached file. The window confirming the product list installation will be displayed (Fig. 13). Figure 13. The product list installation confirmation If you have not found the email with the product list file, contact Kaspersky Lab to describe the problem. You should install new product lists as soon as you receive them from Kaspersky Lab.
Chapter 4. DOrder General Procedures and User Interface 4.1. Starting the Program After you have received the email confirmation of registration in Kaspersky Lab (See item 3.3) and installed the price list file, (See item 3.4) you can start forming and sending orders for keys. Both tasks are performed in the M a i n window of the DOrder program. To display the Main window of the DOrder program 1. Start the program, as described in item 3.2. A login dialog window will be displayed. 2.
D O R D E R G E N E R A L P R O C E D U R E S , U S E R I N T E R F A C E If the program does not display the password dialog window and the M ai n window appears right after the program’s start, a password has not been specified during registration. We recommend you to protect the DOrder by specifying a login password. To do this, change the password in DOrder. Follow the steps in the item 8.2 to specify another password. 4.2.
K A S P E R S K Y L A B L T D . The M ai n window elements are described in the Appendix B. The upper table in the M a i n window is the Pr od uct s Ta bl e. It contains a list of products for which you can order a key. For detailed information about the Pr od uct s Ta bl e, please refer to item 5.1. The Pr ogr a ms T a bl e located below the Pr o du ct s T a bl e displays a list of programs included in the product selected in the Pr o du ct s T a bl e .
D O R D E R G E N E R A L P R O C E D U R E S , U S E R I N T E R F A C E The program configuration menu displayed by clicking the right mouse button in the top left corner of the M a i n window is used to configure DOrder. See item 8.1. 4.3. Quitting the Program To quit the program click the E xi t button in the M ai n window of the program. Information about unsent orders will be lost after quitting DOrder.
Chapter 5. Forming and sending an Order 5.1. Choosing a Product The upper table in the M ai n window, the Pr o duct s Ta bl e, contains a list of products, for which you can order a key. Each product is described by a certain set of attributes presented in Appendix C. To start making an order for a key select the product you want to get a key for by clicking its name on the Pr od uct s Tab l e.
F O R M I N G A N D S E N D I N G A N O R D E R 5.2. Setting the Number of Licenses for the Selected Programs The Pr ogr ams Ta bl e located below the Pr od uct s T a bl e shows a list of programs included in the product selected in the P r o du ct s T a ble. Each program is described by a set of attributes, presented in Appendix D. After choosing the product, for which you are ordering the keys (See item 5.
K A S P E R S K Y L A B L T D . that the desired number is displayed in the Re q ue st column opposite your program’s name. The DOrder program automatically validates numbers you enter in the L ic e n s e field. If you enter a value larger than the maximum allowed for this program displayed in the M a x column, the Re q u est column will be set to the maximum and not to the value specified by you.
F O R M I N G A N D S E N D I N G A N O R D E R the number of such orders in the Qu ant it y field. You will receive keys for each order in a separate email. To form several orders for identical keys 1. Make sure that the selected product allows ordering identical keys (the I de nt ic al Ke y c ol um n of the Pr od uct s Ta b l e contains 1). 2. Select the I de n t it y check box and enter the desired number of identical keys in the Qu an tit y field.
K A S P E R S K Y L A B L T D . Before changing the E x pir at i on Da t e , please contact your supervising manager at Kaspersky Lab. To change the E xpir at i o n dat e va l u e enter a new value in the Ex p ir a t i o n Dat e field. 5.5. Selecting the Key Type There are two types of keys—personal and serial. A personal key may be used only by a person or a company for whom it has been ordered.
F O R M I N G A N D S E N D I N G A N O R D E R 5.6. Entering Registration Information about the End User of the Key The fields in the En d Use r group box, located at the bottom of the M a i n window, are used to enter information about the end user of the product for which the keys are ordered. If you order the serial key, the fields are unavailable. To enter information about the end user (in the case of a personal key) 1. Fill in the Na me and C om pa n y fields of the E nd U ser group box.
K A S P E R S K Y L A B L T D . 2. Enter information in the other fields of the E nd User group box according to the Table 2. If possible, fill in all of the fields. Table 2.
F O R M I N G A N D S E N D I N G A N O R D E R 5.7. Entering License Information for the Key License information for a key restricts the rights of key usage according to the License Agreement. To enter the license information manually Make sure that the Au t o f ill i n g l i ce ns e i nf o check box is clear. 1. Enter the license information in plain-text form in the L ic e n se i nf o field.
K A S P E R S K Y L A B L T D . To fill in the License info field automatically select the Aut o f i ll i ng l i ce n s e i nf o check box. In the case of ordering a serial key, the Au t o fi ll i ng li ce ns e i nf o field is unavailable. Please type the license information in the L i c e n s e i nf o field manually. 5.8. Ordering an Update of the Key If you need to extend a period within which the generated key is available, you may order an update for this key.
F O R M I N G A N D S E N D I N G A N O R D E R 5.9. Sending the Order to Kaspersky Lab To send an order for the key 1. Make sure that you filled in all the fields in the M ai n window correctly. 2. Click the Se nd button. If the information you specified in the Main window is validated successfully, a window with information about the order will be displayed, See Fig. 17. In the case of any errors (i.e., a required field is left empty), an error message appears.
K A S P E R S K Y L A B L T D . 3. Click Ye s, to send the order to Kaspersky Lab. Click NO, to return to the M ai n window and continue forming the order. After clicking the Y e s button, the order is sent, and the confirmation window is displayed, see Fig. 18. In this window, you can specify which fields of the M a i n window should be cleaned, before you will start making another order. Figure 18. T he D i s pa t c h Con f ir mat i o n Window 4.
F O R M I N G A N D S E N D I N G A N O R D E R 2. Find the order you are looking for by using the scroll bar. Each row in the table represents a single order. You can see the order’s details in the columns of the table, see Table 3. Table 3.
K A S P E R S K Y L A B L T D . Figure 19. The Hi st or y window 5.11. Cleaning the Main window To clean the fields of the End User group and to remove information about the requested licenses from the Pr ogr a ms Ta bl e click the Cl e ar button in the M ai n window.
Chapter 6. Receiving and Viewing the Keys 6.1. Receiving the Keys by Email Generated keys that you have ordered are sent to you by email. An example of an email with an attached file containing the keys is shown on Fig. 20. To get the keys 1. Open the program, which you use to receive emails from Kaspersky Lab. 2. Find the email containing the particular order ID in the body. The order ID is the number typed after Request number.
K A S P E R S K Y L A B L T D . Figure 20. A letter with a key from Kaspersky Lab If you have made several orders, the keys of each order will be sent in separate email. If you have ordered different keys, you will receive Q ua nt it y emails, each containing a set of keys for the selected programs; if identical, you will receive a single letter with a set of keys. You are allowed to make Qua n tit y copies of this set. 6.2.
R E C E I V I N G A N D V I E W I N G T H E K E Y S Figure 21. The main window of Ke yV i ew er For a detailed description of the K e yVi ew er program, please refer to the Key Viewer User’s Guide.
Chapter 7. Getting Information about the Program To display the version number of DOrder and other information about the program Click the Kaspersky Lab logo on the bottom right corner of the M ai n window, or choose Ab ou t DO r der … from the configuration menu of DOrder (See item 8.1). The Abo ut Do r der w i n dow will be displayed (Fig. 22). Figure 22.
Chapter 8. Configuring the Program 8.1. Displaying the Configuration Menu To display the configuration menu of the DOrder program (Fig. 23) click the right mouse button in the top left corner of the M ai n window. Figure 23.
K A S P E R S K Y L A B L T D . 8.2. Changing the Program Login Password To change the program login password 1. From the DOrder configuration menu (See item 8.1), choose Cha n ge P as sw or d. If the program login is already protected by a password, the dialog (Fig. 24) will be displayed. Enter the old password in the P as s w or d field and click O K a nd the Us er I nf or mat i on dialog (Fig. 10) will be displayed. Here you can specify a new password. Figure 24. The Password dialog 2.
C O N F I G U R I N G T H E P R O G R A M 3. Click the OK button. If after clicking the OK button, the wrong password message is dis- played click OK to close the message dialog and return to the Us er I nf or mat i on window. Enter a new password in the Pas sw or d and C on f ir m P a ssw or d fields. Be careful when typing the password; both the fields P as sw or d and Co nf ir m Pa s sw or d should contain the same strings. 8.3. Resending the Public Key To resend the public key to DOrder 1.
K A S P E R S K Y L A B L T D . If you have received a rejection of your update by email, contact a Kaspersky Lab technical support specialist. A possible reason for this rejection is sending the key from another email address, not the one registered for you in the internal database of Kaspersky Lab. 8.4. Configuring the Email Client To select the email client for DOrder 1. From the program configuration menu (See item. 8.1), choose E- M a il C on f i g ur e .
Chapter 9. Kaspersky Lab Ltd. If you have any questions, comments or suggestions please refer them to our distributors listed in your Readme.txt or directly to Kaspersky Lab. We will be glad to advise you on any matters related to our product by telephone or e-mail and all your recommendations and suggestions will be thoroughly reviewed and considered. Table 4. How to contact Kaspersky Lab Ltd. Technical Support E-Mail: WWW: Tel: +7 (095) 797-8707, +7 (095) 493-0300 support@kaspersky.com sales@kaspersky.
Appendixes Appendix A. The Input Fields of the User Information Dialog Field Description Allowed Values GUI D The unique identification number of the installation Value is set programmatically. The field is unavailable. Acc o u nt The login name of the user A string of Latin characters, 20 characters or less and not containing reserved symbols (!@#$%^&*”?). Pas sw or d The password string A string of Latin characters, 20 characters or less and not containing reserved symbols (!@#$%^&*”?).
A P P E N D I X E S Appendix B. The Main Window Elements Element Description Pr o du ct s T a bl e Contains a list of Kaspersky Lab’s products, which you are allowed to distribute. For more information about the Pr od uc t s Ta bl e, please refer to item 5.1 and the Appendix C. Pr o gr a ms Ta b l e Contains a list of programs, which constitute the product selected in the Pr od uct s Ta bl e. For more information about the Pr o du c ts T a b l e , please refer to item 5.2 and Appendix D.
K A S P E R S K Y L A B L T D . Element Description I de nt it y c he c k bo x Is used when forming several orders simultaneously. Specifies whether the different keys for each order should be generated, or one set of keys for programs should be created. In the latter case, the set of keys may be used for several installations of the product (identical keys). See item 5.3. Per s ona l c h ec k b ox Is used to set the type of key. See item 5.5.
A P P E N D I X E S Appendix C. The Products Table Field Meaning P osit i on Co de The code of the product S al e Li st N ame The name of the product T ec h nic al Su pp or t The technical support availability (1—the technical support is available, 0—the technical support is not available) I de n t i c al Ke y The capability of ordering identical keys for the product. (1—identical keys are allowed, 0— identical keys are not allowed).
K A S P E R S K Y L A B L T D . Appendix D. The Programs Table Field Meaning Na me The name of the program F ix e d The fixed number of licenses. If this number is zero, the program can be delivered only with the number of licenses displayed in the Fix e d column. If the value in the F i x e d column is not zero, the program can be delivered with any number of licenses, from a range set by M i n, M ax. M in The minimal number of licenses with which the program can be delivered.