
Product Manual

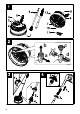
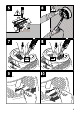
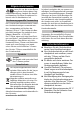


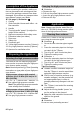


Table Of Contents

8 English
When unpacking the product, make sure
that no accessories are missing and that
none of the package contents have been
damaged. If you detect any transport dam-
ages please contact your dealer.
See page 2, illustration
1 Casing
2 Slide controller Hoovercraft effect - air-
flow controller
3 Handle
4 Turning handle "power" (to adjust the
height of the nozzles)
5 Bayonet connection with safety cover
6 Extension tubes (two tubes)
7 Rotor arm
8 Safety clip
9 Protective grid
10 Yellow high pressure nozzles (2 pieces)
11 Grey high-pressure nozzles (2 pieces)
12 Aperture for ventilation slots
You need to use the matching high pres-
sure nozzles to ensure that your high pres-
sure cleaner works properly.
Note: Nominal pressure (p): See Operating
Instructions or type plate of your high pres-
sure cleaner.
e.g.: K 6 – K 7, Kärcher 600 – Kärcher 770
Use yellow high-pressure nozzles.
Note:The yellow high-pressure nozzles
have already been installed.
e.g.: K 4 – K 5, Kärcher 201 – Kärcher 560
Use grey high-pressure nozzles.
Illustration
Note: Always use Kärcher water filter (or-
der no. 4.730-059.0) during suction opera-
tions of the high-pressure cleaner.
Fasten the T-Racer to the high-pressure
gun using the extension pipes.
Illustration
1 Screw the two extension pipes togeth-
er.
2 Press the extension pipe into the bayo-
net catch of the T-Racer.
3 Turn it by 90° until it locks into place.
4 Tighten the safety cover.
Illustration
1 Press the extension pipe into the bayo-
net catch of the high pressure gun.
2 Turn it by 90° until it locks into place.
3 Tighten the safety cover.
Outdoor surfaces should be swept be-
fore the T-Racer is used to avoid dam-
aging the high-pressure nozzles.
Prior to use on sensitive surfaces (e.g.
wooden surfaces), test the product on
an imperceptible spot, in order to
promptly detect any changes in the sur-
face.
The T-Racer is not suited for scouring
or scrubbing!
Adjust the turning handle "power" as
per the surface to be cleaned
Adapt the slide controller Hoovercraft
effect to the ground.
Caution
Illustration
Do not run over protruding corners!
Description of the Appliance
Preparing the Appliance
Selecting the high pressure nozzles
High-pressure cleaner with nominal
pressure (p) of 13 MPa (130 bar) to 16
MPa (160 bar)
High-pressure cleaner with nominal
voltage (p) lesser than 13 MPa (130 bar)
Changing the high pressure nozzles
a Remove the clip.
b Pull out the yellow high-pressure nozzle.
c Insert the grey high-pressure nozzle.
d Reinsert the clip.
Application
Cleaning floor surfaces
Tips for cleaning