
FAQ


FAQS
■
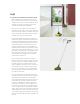
How do you assemble the handle on the KB
5? The handle of the KB 5 has a total of 6
parts. These parts include: the actual handle,
3 metal tubes (that will form the body of the
handle) and 2 plastic connectors (that will
connect the metal tubes together).
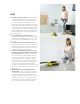
Once you have located all of these pieces,
arrange them in front of you in the following
order: the plastic handle, one metal tube, one
plastic connector, one metal tube, one plastic
connector, and the final metal tube.
Next, starting with the handle and the first
metal tube, align the handle and tube so that
the back (elongated) part of the handle and
the back of the metal tube (the part with the
slight indentations) are facing towards you.
Then, insert the base tip of the handle into
the metal tube and rest the open base of the
metal tube on the ground (please do so on an
area with a secured rug or carpeting). Using a
good amount of pressure, press the handle
into the tube until snuggly fit. It may take
some force to slide it in.
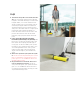
Then, arrange the first plastic connector so
that the notches are facing towards you (the
notches will line up with the indentations on
the metal tube once inserted and seal the
pieces together). Insert the plastic connector
into the base of the first tube and place the
base of the connector on the ground before
pushing from the handle to slide the connec-
tor into the first tube.
You will then attach the second tube to the
second connector in the same manner before
sliding the final connector in and then the
final tube. Please make sure that all items on
the handle are snuggly fit. Once the whole
handle is assembled, it’s time to place the
handle onto the base of the unit. Make sure
the black connector piece on the base of the
unit is upright and push the handle straight
down until it snaps into place. Once again, the
slight indentations on the back of the handle
should be facing towards the back of machine
(the part with the LED light and charging cord
portal).