
Operating instructions
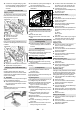
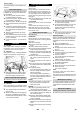

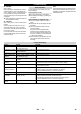
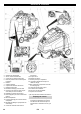
Table Of Contents
- Deutsch
- Inhaltsverzeichnis
- Sicherheitshinweise
- Funktion
- Bestimmungsgemäße Verwendung
- Umweltschutz
- Bedienelemente
- Vor Inbetriebnahme
- Betrieb
- Grauer Intelligent Key
- Transport
- Lagerung
- Pflege und Wartung
- Hilfe bei Störungen
- Technische Daten
- Zubehör und Ersatzteile
- Garantie
- EU-Konformitätserklärung
- English
- Contents
- Safety instructions
- Function
- Proper use
- Environmental protection
- Control elements
- Before Commissioning
- Operation
- Grey Intelligent Key
- Transport
- Storage
- Care and maintenance
- Troubleshooting
- Technical specifications
- Accessories and Spare Parts
- Warranty
- EU Declaration of Conformity
- Français
- Table des matières
- Consignes de sécurité
- Fonction
- Utilisation conforme
- Protection de l’environnement
- Eléments de commande
- Avant la mise en service
- Fonctionnement
- Intelligent Key grise
- Transport
- Entreposage
- Entretien et maintenance
- Assistance en cas de panne
- Caractéristiques techniques
- Accessoires et pièces de rechange
- Garantie
- Déclaration UE de conformité
- Italiano
- Indice
- Norme di sicurezza
- Funzione
- Uso conforme a destinazione
- Protezione dell’ambiente
- Dispositivi di comando
- Prima della messa in funzione
- Funzionamento
- Accendere l’apparecchio
- Verifica del freno di stazionamento
- Guidare
- Aggiungere carburante e sostanze aggiuntive
- Impostazione dei parametri
- Regolare la barra di aspirazione
- Svuotare il serbatoio dell'acqua sporco
- Svuotare il serbatoio dell'acqua pulita
- Svuotare il contenitore dello sporco grossolano (solo per testa di pulizia R)
- Messa fuori servizio
- Intelligent Key grigia
- Trasporto
- Supporto
- Cura e manutenzione
- Guida alla risoluzione dei guasti
- Dati tecnici
- Accessori e ricambi
- Garanzia
- Dichiarazione di conformità UE
- Nederlands
- Inhoud
- Veiligheidsinstructies
- Functie
- Reglementair gebruik
- Zorg voor het milieu
- Bedieningselementen
- Voor ingebruikneming
- Werking
- Grijze Intelligent Key
- Transport
- Opslag
- Onderhoud
- Hulp bij storingen
- Technische gegevens
- Toebehoren en reserveonderdelen
- Garantie
- EU-conformiteitsverklaring
- Español
- Índice de contenidos
- Indicaciones de seguridad
- Función
- Uso previsto
- Protección del medio ambiente
- Elementos de mando
- Antes de la puesta en marcha
- Funcionamiento
- Conexión del aparato
- Comprobar el freno de estacionamiento
- Conducción
- Adición de combustibles
- Ajustar parámetros
- Ajuste de la barra de aspiración
- Vaciado del depósito de agua sucia
- Vaciado del depósito de agua limpia
- Vaciar el depósito de particulas gruesas (sólo en el cabezal limpiador R)
- Puesta fuera de servicio
- Intelligent Key gris
- Transporte
- Almacenamiento
- Cuidados y mantenimiento
- Ayuda en caso de avería
- Datos técnicos
- Accesorios y piezas de repuesto
- Garantía
- Declaración UE de conformidad
- Português
- Índice
- Avisos de segurança
- Funcionamento
- Utilização conforme o fim a que se destina a máquina
- Proteção do meio-ambiente
- Elementos de manuseamento
- Antes de colocar em funcionamento
- Funcionamento
- Intelligent Key cinzento
- Transporte
- Armazenamento
- Conservação e manutenção
- Ajuda em caso de avarias
- Dados técnicos
- Acessórios e peças sobressalentes
- Garantia
- Declaração UE de conformidade
- Dansk
- Indholdsfortegnelse
- Sikkerhedsanvisninger
- Funktion
- Bestemmelsesmæssig anvendelse
- Miljøbeskyttelse
- Betjeningselementer
- Inden idrifttagning
- Drift
- Grå Intelligent Key
- Transport
- Opbevaring
- Pleje og vedligeholdelse
- Hjælp ved fejl
- Tekniske data
- Tilbehør og reservedele
- Garanti
- EU-overensstemmelses- erklæring
- Norsk
- Innholdsfortegnelse
- Sikkerhetsanvisninger
- Funksjon
- Forskriftsmessig bruk
- Miljøvern
- Betjeningselementer
- Før igangsetting
- Drift
- Grå Intelligent Key
- Transport
- Lagring
- Pleie og vedlikehold
- Feilretting
- Tekniske data
- Tilbehør og reservedeler
- Garanti
- EU-samsvarserklæring
- Svenska
- Innehållsförteckning
- Säkerhetsanvisningar
- Funktion
- Ändamålsenlig användning
- Miljöskydd
- Reglage
- Före idrifttagandet
- Drift
- Grå Intelligent Key
- Transport
- Förvaring
- Skötsel och underhåll
- Åtgärder vid störningar
- Tekniska data
- Tillbehör och reservdelar
- Garanti
- EU-försäkran om överensstämmelse
- Suomi
- Sisällysluettelo
- Turvaohjeet
- Toiminto
- Käyttötarkoitus
- Ympäristönsuojelu
- Hallintalaitteet
- Ennen käyttöönottoa
- Käyttö
- Harmaa Intelligent Key
- Kuljetus
- Säilytys
- Hoito ja huolto
- Häiriöapu
- Tekniset tiedot
- Varusteet ja varaosat
- Takuu
- EY-vaatimustenmukaisuus- vakuutus
- Ελληνικά
- Πίνακας περιεχομένων
- Υποδείξεις ασφαλείας
- Λειτουργία
- Χρήση σύμφωνα με τους κανονισμούς
- Προστασία περιβάλλοντος
- Στοιχεία χειρισμού
- Πριν την ενεργοποίηση
- Λειτουργία
- Γκρίζο Intelligent Key
- Μεταφορά
- Αποθήκευση
- Φροντίδα και συντήρηση
- Αντιμετώπιση βλαβών
- Τεχνικά χαρακτηριστικά
- Εξαρτήματα και ανταλλακτικά
- Εγγύηση
- Δήλωση Συμμόρφωσης των ΕE
- Türkçe
- İçindekiler
- Güvenlik uyarıları
- Fonksiyon
- Kurallara uygun kullanım
- Çevre koruma
- Kumanda elemanları
- Cihazı çalıştırmaya başlamadan önce
- Çalıştırma
- Gri Akıllı Anahtar
- Taşıma
- Depolama
- Koruma ve Bakım
- Arızalarda yardım
- Teknik Bilgiler
- Aksesuarlar ve yedek parçalar
- Garanti
- AB uygunluk bildirisi
- Русский
- Оглавление
- Указания по технике безопасности
- Назначение
- Использование по назначению
- Защита окружающей среды
- Элементы управления
- Перед началом работы
- Эксплуатация
- Включение прибора
- Проверка стояночного тормоза
- Движение
- Заполнение рабочих жидкостей
- Установить параметр
- Настройка всасывающей планки
- Удаление содержимого из резервуара для грязной воды
- Удаление содержимого из резервуара для чистой воды
- Опорожнить резервуар для крупных частиц грязи (только для очистительной головки R)
- Окончание работы
- Серый чип-ключ
- Транспортировка
- Хранение
- Уход и техническое обслуживание
- Помощь в случае неполадок
- Технические данные
- Принадлежности и запасные детали
- Гарантия
- Заявление о соответствии ЕU
- Magyar
- Tartalomjegyzék
- Biztonsági tanácsok
- Funkció
- Rendeltetésszerű használat
- Környezetvédelem
- Kezelési elemek
- Üzembevétel előtt
- Üzem
- Szürke Intelligent Key
- Szállítás
- Tárolás
- Ápolás és karbantartás
- Segítség üzemzavar esetén
- Műszaki adatok
- Tartozékok és alkatrészek
- Garancia
- EU konformitási nyilatkozat
- Čeština
- Obsah
- Bezpečnostní pokyny
- Funkce
- Používání v souladu s určením
- Ochrana životního prostředí
- Ovládací prvky
- Pokyny před uvedením přístroje do provozu
- Provoz
- Šedý Intelligent Key
- Přeprava
- Ukládání
- Ošetřování a údržba
- Pomoc při poruchách
- Technické údaje
- Příslušenství a náhradní díly
- Záruka
- EU prohlášení o shodě
- Slovenščina
- Vsebinsko kazalo
- Varnostna navodila
- Delovanje
- Namenska uporaba
- Varstvo okolja
- Upravljalni elementi
- Pred zagonom
- Obratovanje
- Sivi Inteligentni ključ
- Transport
- Skladiščenje
- Vzdrževanje
- Pomoč pri motnjah
- Tehnični podatki
- Pribor in nadomestni deli
- Garancija
- Izjava EU o skladnosti
- Polski
- Spis treści
- Wskazówki bezpieczeństwa
- Przeznaczenie
- Użytkowanie zgodne z przeznaczeniem
- Ochrona środowiska
- Elementy obsługi
- Przed uruchomieniem
- Działanie
- Szary Intelligent Key
- Transport
- Przechowywanie
- Czyszczenie i konserwacja
- Usuwanie usterek
- Dane techniczne
- Wyposażenie dodatkowe i części zamienne
- Gwarancja
- Deklaracja zgodności UE
- Româneşte
- Cuprins
- Măsuri de siguranţă
- Funcţionarea
- Utilizarea corectă
- Protecţia mediului înconjurător
- Elemente de operare
- Înainte de punerea în funcţiune
- Funcţionarea
- Pornirea aparatului
- Verificarea frânei de imobilizare
- Deplasarea
- Umplerea substanţelor tehnologice
- Reglarea parametrilor
- Reglarea tijei de aspiraţie
- Golirea rezervorului pentru apă uzată
- Goliţi rezervorul pentru apă curată
- Goliţi rezervorul pentru murdării grosiere (numai la cap de curăţare R)
- Scoaterea din funcţiune
- Cheie inteligentă gri
- Transportul
- Depozitarea
- Îngrijirea şi întreţinerea
- Remedierea defecţiunilor
- Date tehnice
- Accesorii şi piese de schimb
- Garanţie
- Declaraţie UE de conformitate
- Slovenčina
- Obsah
- Bezpečnostné pokyny
- Funkcia
- Používanie výrobku v súlade s jeho určením
- Ochrana životného prostredia
- Ovládacie prvky
- Pred uvedením do prevádzky
- Prevádzka
- Šedý Intelligent Key
- Preprava
- Uskladnenie
- Starostlivosť a údržba
- Pomoc pri poruchách
- Technické údaje
- Príslušenstvo a náhradné diely
- Záruka
- EÚ Vyhlásenie o zhode
- Hrvatski
- Pregled sadržaja
- Sigurnosni napuci
- Funkcija
- Namjensko korištenje
- Zaštita okoliša
- Komandni elementi
- Prije prve uporabe
- U radu
- Sivi ključ "Intelligent Key"
- Transport
- Skladištenje
- Njega i održavanje
- Otklanjanje smetnji
- Tehnički podaci
- Pribor i pričuvni dijelovi
- Jamstvo
- EU izjava o suklađnosti
- Srpski
- Pregled sadržaja
- Sigurnosne napomene
- Funkcija
- Namensko korišćenje
- Zaštita životne sredine
- Komandni elementi
- Pre upotrebe
- Rad
- Sivi ključ "Intelligent Key"
- Transport
- Skladištenje
- Nega i održavanje
- Otklanjanje smetnji
- Tehnički podaci
- Pribor i rezervni delovi
- Garancija
- Izjava o usklađenosti sa propisima EU
- Български
- Съдържание
- Указания за безопасност
- Функция
- Употреба по предназначение
- Опазване на околната среда
- Обслужващи елементи
- Преди пускане в експлоатация
- Експлоатация
- Включване на уреда
- Проверка на застопоряващата спирачка
- Пътуване
- Напълнете горивни материали
- Настройка на параметрите
- Настройка лента засмукване
- Изпразване на резевоара за мръсна вода
- Изпразнете танка за чиста вода
- Изпразване на резервоара за груби отпадъци (само при R- почистваща глава)
- Сваляне от експлоатация
- Сив интелигентен ключ
- Транспорт
- Съхранение
- Грижи и поддръжка
- Помощ при неизправности
- Технически данни
- Принадлежности и резервни части
- Гаранция
- EC Декларация за съответствие
- Eesti
- Sisukord
- Ohutusalased märkused
- Funktsioon
- Sihipärane kasutamine
- Keskkonnakaitse
- Teeninduselemendid
- Enne seadme kasutuselevõttu
- Käitamine
- Hall Intelligent Key
- Transport
- Hoiulepanek
- Korrashoid ja tehnohooldus
- Abi häirete korral
- Tehnilised andmed
- Lisavarustus ja varuosad
- Garantii
- ELi vastavusdeklaratsioon
- Latviešu
- Satura rādītājs
- Drošības norādījumi
- Iekārtas funkcionēšana
- Noteikumiem atbilstoša lietošana
- Vides aizsardzība
- Vadības elementi
- Pirms ekspluatācijas sākuma
- Darbība
- Pelēkā Intelligent Key
- Aparāta pārvietošana
- Glabāšana
- Kopšana un tehniskā apkope
- Palīdzība darbības traucējumu gadījumā
- Tehniskie dati
- Piederumi un rezerves daļas
- Garantija
- ES Atbilstības deklarācija
- Lietuviškai
- Turinys
- Saugos reikalavimai
- Veikimas
- Naudojimas pagal paskirtį
- Aplinkos apsauga
- Valdymo elementai
- Prieš pradedant naudoti
- Naudojimas
- Pilkas išmanusis raktas
- Transportavimas
- Laikymas
- Priežiūra ir aptarnavimas
- Pagalba gedimų atveju
- Techniniai duomenys
- Priedai ir atsarginės dalys
- Garantija
- ES atitikties deklaracija
- Українська
- Зміст
- Правила безпеки
- Функціонування
- Правильне застосування
- Захист навколишнього середовища
- Елементи керування
- Перед введенням в експлуатацію
- Експлуатація
- Ввімкнення пристрою
- Перевірка стоянкового гальма
- Експлуатація
- Заповнення робочих рідин
- Встановити параметр
- Встановлення всмоктувальної пластини
- Видалення вмісту з резервуара для брудної води
- Видалення вмісту з резервуара для чистої води
- Спорожнити резервуар для великих часток бруду (тільки для очисної голівки R)
- Виведення з експлуатації
- Сірий чіп-ключ
- Транспортування
- Зберігання
- Догляд та технічне обслуговування
- Допомога у випадку неполадок
- Технічні характеристики
- Приладдя й запасні деталі
- Гарантія
- Заява при відповідність Європейського співтовариства

- 9
Squeeze the locking hooks.
Pull off the float.
Turn the protective turbine strainer in a
counter-clockwise direction.
Remove protective turbine strainer.
Rinse dirt off the protective turbine
strainer with water.
Reattach protective turbine strainer.
Attach float.
Remove the vacuum bar.
Unscrew the star grips.
Remove the plastic parts.
Remove the vacuum lips.
Insert new vacuum lips.
Insert the plastic parts.
Screw in and tighten the star grips.
R cleaning head: Unscrew the star han-
dle and remove the lid.
D cleaning head: Remove the lid of the
cleaning head.
Place the cleaning head centrally under
the device.
Connect the power cord of the cleaning
head to the appliance (same colours
must meet).
R cleaning head: Slide the lid in and
tighten the screw.
D cleaning head: Replace the lid and
lock it.
Connect the hose couplers on the
cleaning head to the hose on the appli-
ance.
Insert the tab into the middle of the
cleaning head, between the fork of the
lever.
Align the lever so that the drilled holes
in the lever and the cleaning head
match.
Insert the retaining pin through the
drilled holes and swivel the locking
plate downwards so that it snaps into
place.
Select the floor clearance of the spray
guard by turning the adjustment wheel.
Lift the cleaning head.
Loosen the lock of the wiper flap.
Swivel the wiping flap out of the way.
Loosen the lock of the wiper flap.
Push the bearing lid down and remove.
Pull out the brush roller.
Insert a new brush roller.
Reattach the bearing lid and the wiper
flap in reverse sequence.
Repeat process on the opposite side.
Lift the cleaning head.
Press the pedal for changing the brush-
es downward beyond its resistance.
Pull the disc brush out of the side below
the cleaning head.
Hold the new disc brush under the
cleaning head, push upward and lock.
In case of danger of frost:
Empty the fresh and dirt water reser-
voirs.
Store the appliance in a frost-protected
room.
Open the lock of the battery cover.
Tilt the battery cover backwards.
Push the lock of the battery insert to-
wards the left and tilt it downward.
Pull the battery insert towards the rear.
Clamp off the minus pole of the battery.
Clamp off the remaining cables from the
battery.
Remove the batteries.
Dispose of the used batteries according
to the local provisions.
Replacing the vacuum lips
Install cleaning head
Mount splash guard
Replacing the brush rollers
Replacing the Disk Brushes
Frost protection
Removing the batteries
24 EN