
User's Manual

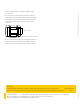

TRP-8100 Transponder - Rear View
1. Clean the mounting location in accordance with 3M document
70-0709-4029-4.
2. Remove the protective backing from the two Dual Lock fasteners
and press the transponder onto the mounting location, ensuring the
status LEDs on the left side of the transponder are facing the driver.
Maintain the pressure for approximately 15 seconds to ensure a
good bond.
801850-023 rev A1.
©Kapsch TracCom IVHS. All rights reserved. Subject to alteration without notice.
3. Remove the transponder by lifting any corner with sucient force to
separate the Dual Lock strips. Do not reuse the Dual Lock strips if
removing them from the windshield. Obtain new strips as required.
Kapsch TracCom IVHS | 6020 Ambler Drive | Mississauga, Ontario L4W 2P1 | CANADA | Phone +1 905 624 3020 | Fax +1 905 625 6197
54 S. Commerce Way, Suite 100 | Bethlehem, PA 18017 | Phone +1 610 419 1479 | Fax +1 610 419 1489
E-Mail ktc.ca.info@kapsch.net | ktc.us.info@kapsch.net | www.kapsch.net
Kapsch Group
The Kapsch Group and its entities Kapsch TracCom, Kapsch CarrierCom and Kapsch BusinessCom are specialised in the future-oriented market
segments of Intelligent Transportation Systems (ITS) and Information and Communication Technology (ICT). Kapsch. Always one ste p ahead.
Dual Lock fasteners