
Operations and Maintenance Manual
_
JANUS
®
Multi-Protocol Reader Ver. 2: Appendix
Confidential UM 360450-210 Revision C Page 233 of 288
© Kapsch TrafficCom Canada Inc. 2014
These drawings and specifications contain confidential and proprietary information and are the property of Kapsch TrafficCom Canada Inc. and are issued in strict
confidence and will be kept confidential and used solely for the purpose intended and for no other purpose and shall not be transmitted, reproduced, copied, and/or
used as the basis for manufacture or sale of apparatus unless otherwise agreed to in writing by Kapsch TrafficCom Canada Inc.
FILE: UM 360450-210 REV C JANUS MPR2 OPERATOR-MAINTENANCE MANUAL.DOCX 08/17/2015 11:42
Kapsch TrafficCom
Installing a PSM
CAUTION:
To avoid damaging the modules, ensure that the connector on the
module properly aligns with the connector on the DSM back plane
before the module is securely plugged into the DSM.
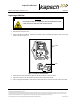
1. Install a new PSM in the Reader Rack.
2. Set the power switch of the new PSM to the on position.
3. Ensure that the new PSM +5 and +15 LEDs illuminate solid green.
4. Switch the Reader back over to the new PSM side (see Manually switching a Reader to the redundant
side, page 39).
CFM replacement
WARNING:
THE MODULES MAY HAVE SHARP EDGES. HANDLE THE MODULES
CAREFULLY. WHENEVER POSSIBLE, USE A MODULE EXTRACTION
TOOL TO REMOVE A MODULE.
Removing a CFM
1. If possible, save the configuration file of the CFM being replaced (see Saving the Reader configuration,
page 246).
2. Remove the CTM on the side of the faulty CFM (see CTM, page 229).
3. While pushing on plastic clips, pull CFM straight out from DSM.
Installing a CFM
1. Push CFM straight into connector on DSM until an audible click is heard.
2. Install the CTM removed in step 2 (see CTM, page 229).
3. Load the configuration file saved in step 1 to the new CFM (see Uploading a saved configuration, page
246), or locate and upload the latest saved Reader configuration.