
User's Manual


_
JANUS
®
Multi-Protocol Reader Ver. 2: Maintenance Instructions
Confidential UM 360450-210: A7 Page 231 of 282
© Kapsch TrafficCom Canada Inc. 2013
These drawings and specifications contain confidential and proprietary information and are the property of Kapsch TrafficCom Canada Inc. and are issued in strict
confidence and will be kept confidential and used solely for the purpose intended and for no other purpose and shall not be transmitted, reproduced, copied, and/or
used as the basis for manufacture or sale of apparatus unless otherwise agreed to in writing by Kapsch TrafficCom Canada Inc.
FILE: UM 360450-210 OPERATIONS AND MAINTENANCE MANUAL.DOCX 10/31/2013 7:56
Kapsch TrafficCom
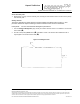
4. Enter the number of consecutive test tag faults that cause a channel to be considered bad in the Test Tag
Single Fault Threshold text box.
Note: This should be set to 5 or higher.
5. Enter the number of bad channels that will trigger an automatic switchover, if the SPM redundancy switch is in
AUTO, in the Test Tag Multiple Fault Threshold text box.
Note: This value must be less than or equal to the number of RF channels equipped with test tags.
6. Enter the period of time between test tag checks, in seconds, in the Test Tag Period check box.
Note: This should be set between 30 and 90 seconds.
7. Press Enter or select a different tab to accept .
New firmware
Periodically, Kapsch Service will release a new version of the Reader firmware. The firmware name
indicates the year, month, day, and revision number of the release.
This procedure outlines how to upload the new firmware to the Reader so it can then be activated.
Uploading new firmware
Prerequisites: A service laptop containing a copy of the latest firmware is connected to either the
Ethernet 1 or a USB port and then logged into the CTM web interface.
You must have Software Management permissions.
CAUTION:
On a redundant Reader, ensure that the redundant side has no
fault conditions and all lane controller links are functioning
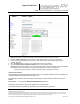
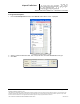
1. Select the Manage Software link from the left panel of the screen.
Result: The following Software Update page appears.