
User's Manual
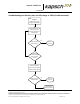
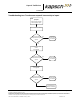
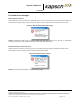

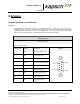
Table Of Contents
- Document Revision Control
- 1. About This Manual
- 2. Overview
- 3. Operating Procedures
- Starting up the Portable RSE
- NOTE: The Portable RSE will automatically start up when connected to external AC power.
- 1. Press the Power button .The green power-up LED lights for approximately 10 seconds while the Portable RSE begins booting up.
- 2. The Ultra-Rugged Field PC and Windows Mobile boot splash screens appear. After Windows Mobile has started, the Portable RSE software automatically launches.
- 3. A Health Check is automatically performed and messages are displayed if any errors are found. Total boot-up time is approximately one (1) minute.
- Suspending the Portable RSE
- Waking the Portable RSE
- Powering off the Portable RSE
- 1. Press and hold the Power button until the Power Button menu appears.
- 2. From the Power Button menu, press the Power Off button. The Power Off button will not be available if the RSE is charging.
- 3. A warning message appears, stating that unsaved data will be lost. Select OK. No OBU data is lost when the RSE is powered off.
- Resetting (Rebooting) the Portable RSE
- Checking battery power remaining
- Viewing the general battery level
- 1. Tap the time displayed in the upper-right corner of any screen.
- 2. If the Portable RSE is running on battery power, the battery level is shown between 1 to 4 bars, with an exclamation mark indicating a low battery level. If the Portable RSE is running on AC power, a power cord connection icon is displayed. To vie...
- Viewing the detailed battery level
- 3. For a more detailed battery level indication, Tap ( Settings (System tab(Power. ( Battery tab. The battery power level is shown in a bar graph, and the total mAH consumed. 0 mAH consumed indicates the battery is 100% charged while 3900 mAH consumed...
- Unlocking the Portable RSE
- Returning to the Portable RSE program
- Restart the Portable RSE software
- Reading OBUs
- 1. From the Portable RSE main menu, tap Read OBU. The OBU Acquisition screen appears.
- 2. With the Portable RSE orientated as outlined in Scanning Zones, page 30, from the OBU Acquisition screen, tap Read OBU.
- NOTE: A blue highlighted OBU Read Success message indicates saved OBU data is being displayed. A green highlighted OBU Read Success message indicates data from the latest OBU read is being displayed.
- 3. After approx. 1 or 2 seconds, the Read result status is displayed. If OBU Read Success is displayed, the OBU data has been successfully read. Any other message indicates a Read error. See Table 3-1, page 30.
- Scanning Zones
- Reviewing saved OBU data
- Viewing Agency and Scratch pad data
- 1. From the OBU Acquisition screen, press the navigation button, as required, to display the OBU record whose Agency and/or Scratchpad data you wish to view.
- 2. Tap OBU Data at the bottom-left of the OBU Acquisition screen.
- 3. Select Agency or Scratchpad, as applicable. The selected data fields are displayed.
- 4. To view Agency or Scratchpad data from another OBU record, tap Previous to return to the OBU Acquisition screen and repeat steps 1 through 3.
- Transferring Data to the LC
- 1. From the main menu, tap LC transfer. The Transfer screen appears.
- NOTE: The OBU records are automatically deleted after they have been successfully transferred to the LC.
- 2. From the Transfer screen, tap Transfer to immediately begin transferring the stored OBU records to the LC. A blue Transfer Status bar indicates the progress of the transfer.
- 3. After the records have been successful transfer, a confirmation message appears:
- 4. If any error messages appear, resolve the errors as outlined in LC Transfer Error messages, page 56.
- Erasing OBU data
- 1. From the Main menu, OBU Acquisition screen, Agency Screen, or Scratchpad Screen: Tap Menu in the bottom-right of the screen ( tap Config. ( tap the OBU Data tab.
- 2. Read the warning message. Tap Erase OBU Data ( tap OK in the Erase OBU Data pop-up window to confirm ( tap Yes in the second Erase OBU Data pop-up window to delete all OBU data.
- 3. When you return to the OBU Acquisition screen, the total number of OBU records will now be zero.
- Command and Controls
- Starting up the Portable RSE
- 4. Theory of Operations
- 5. Installation and Configuration
- Installing an antenna
- 1. Connect the antenna to the Portable RSE.
- 2. Connect the 50 Ω RF terminator to the unused antenna terminal.
- 3. Configure the Portable RSE antenna settings:
- NOTE: When the Portable RSE antenna is configured for LONG_RANGE, the RF Power is automatically set to HIGH and cannot be changed to ensure the maximum communication distance.
- NOTE: Tapping in the upper-right corner will exit the Config screen without making changes.
- Configuring automatic suspending
- 1. Navigate to the Configuration screen by tapping Menu in the bottom-right corner, tapping Config, then tapping the Hibernate tab.
- 2. To configure automatic Hibernate when the RSE is running on battery power, select the On Battery Power check box, then select a duration (between 1 and 5 min.) from the drop-down menu. The duration selected is the time the RSE is inactive while ope...
- 3. To configure automatic Hibernate when the RSE is running on AC power, select the On External Power check box then select a duration (between 1 and 30 min.) from the drop-down menu. The duration selected is the time the RSE is inactive while operati...
- Configuring automatic backlight and screen dimming
- 1. Tap ( Settings (System tab(Backlight . The Backlight settings are displayed.
- 2. The backlight settings for running on battery power and external power are configured separately. Tap the applicable along the bottom of the Backlight screen to configure the appropriate settings.
- 3. Select Turn off backlight if device is not used for to enable backlight and screen dimming. Select a duration, from 10 sec. to 5 min., from the drop-down menu.
- 4. Select Turn on backlight when a button is pressed or the screen is tapped. If this option is not selected, the only way to return the screen to normal brightness is to suspend and then wake the Portable RSE.
- 5. Tap to exit the Backlight screen, then tap to return to the Portable RSE software.
- Setting the time and date
- Installing an antenna
- 6. Troubleshooting
- Troubleshooting Methodology
- Returning the Portable RSE for service
- Performing a Health Check on the Diagnostics screen
- To perform a Health Check:
- 1. From any screen (except the Config or About screen), tap Menu in the bottom-right corner, then, tap Diagnostics. The Diagnostics screen appears.
- NOTE: The Health Check Status shown when the Diagnostics screen appears is the result from the previous Health Check.
- 2. To perform a new Health Check, tap Perform Health Check.
- 3. After a short delay while the tests are being performed, the Health Check Status is displayed (see Table 6-1: Health Check Status Results). If any errors appear, return the Portable RSE for repairs.
- 4. Tap Ok to exit the Diagnostics screen.
- Troubleshooting tree: Difficulty reading OBUs consistently
- Troubleshooting tree: Battery does not fully charge to 100% (0 mAH consumed)
- Troubleshooting tree: Touchscreen responds inaccurately to inputs
- LC Transfer Error messages
- 7. Maintenance Procedures
- Cleaning the Portable RSE touch screen
- Protecting the touchscreen
- Calibrating the touchscreen
- 1. Tap ( Settings (System tab(Screen .
- 2. From the General tab, tap Align Screen. The Align Screen window appears.
- 3. In the center of the Align Screen are crosshairs. Firmly and accurately tap the center of the crosshairs with a stylus. The crosshairs move to the upper-left corner of the Align Screen.
- 4. Continue firmly and accurately tapping the crosshairs as they move to the four corners of the Align Screen.
- 5. If calibration is successful, the General tab of the Screen settings appears after the upper-right crosshair is tapped and calibration is complete.
- 6. If calibration fails, the crosshairs reappear in the center of Align Screen and the calibration procedure repeats. Ensure you tap the center of the crosshairs firmly and accurately.
- 7. If calibration continues to fail:
- Replacing the battery pack
- Determining the software and firmware versions
- 8. Appendix

Portable RSE
DOC#: UM 360453-700 REVISION: C Page 61 of 65
© Kapsch TrafficCom Canada Inc. 2013
These drawings and specifications contain confidential and proprietary information and are the property of Kapsch TrafficCom Canada Inc. and are issued in strict confidence
and will be kept confidential and used solely for the purpose intended and for no other purpose and shall not be transmitted, reproduced, copied, and/or used as the basis for
manufacture or sale of apparatus unless otherwise agreed to in writing by Kapsch TrafficCom Canada Inc.
FILE: P-RSE USER MANUAL - UM360453-700 REV_C.DOCX 08/19/2016 1:44
Kapsch TrafficCom
Reference Documents
ICD 360430-101 Interface Control Document for the Next Generation RSE External Hardware
Interface.
ICD 360453-702 Portable RSE Reporting Interface Control Document
FSP-001 IAG Lane Tuning Procedure
322704-TAB Calibration Procedures
322710-078 Gold Transponder and Production Tester Calibration and Maintenance Procedure
Other commercial Documents:
14928-05 Field PC User Guide