
Installation & Assembly


9
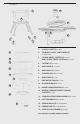
ASSEMBLY
Grill Set-Up
UNBOXING YOUR GRILL
1 Cut the plastic bands and remove the top and side panels of
the shipping container.
2 Lift off the top piece of the grill cart and remove the plastic
from the top of the grill.
3 Open the dome of the grill and remove the components from
the inside of the grill. Handle the internal ceramic parts with care
.
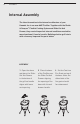
KAMADO JOE GRILL WITH CART
1 Once the internal components of the grill have been removed,
lift the grill out of the container and set it aside. Due to the weight
of this grill, we highly recommend two people perform this task.
Do NOT lift the grill by the side shelf tabs. Use the rear hinge
and the front lower vent opening as lifting points.
2 Remove the plastic wrapping from the base of the grill cart.
3 Lock the casters on the bottom portion of the grill cart.
Assemble the two pieces of the grill cart with the provided
stainless steel screws which are preassembled to the bottom
portion of the cart.
4 With the same lifting technique used previously, lift the grill
into the cart. Adjust the grill in the cart so the lower grill vent is
facing the front of the cart. The front side of the cart is the side
with the two locking casters.
STAND-ALONE GRILL WITH KAMADO TABLE
1 Place the three grill feet on the bottom shelf of the grill table to
form a triangle with the single point being at the back side of the
grill table. The other two feet should be placed just to the left and
right of the lower vent on the front side of the grill.
2 Gently place the grill into the table and adjust the feet. Handle
the grill with care to avoid damaging the grill table surface. We
recommend that two people lift the grill into the table.