Meat Grinder Máquina para picar la carne USK MGR 25959 www.KALORIK.
IMPORTANT SAFEGUARDS Please read these instructions carefully before using the appliance and check that your mains voltage corresponds to that stated on the appliance. From time to time check the appliance for damages. Never use the appliance if it shows any signs of damage, but have it checked by a competent qualified electrician (*). Should the cord be damaged, it must be replaced by a competent qualified electrician(*). Never leave the appliance unsupervised when in use.
You must keep this appliance clean, as it is in direct contact with food. (*) Competent qualified electrician: after sales department of the producer or importer or any person who is qualified, approved and competent to perform this kind of repairs in order to avoid all danger. In any case you should return the appliance to this electrician. SAVE THESE INSTRUCTIONS POLARIZED PLUG INSTRUCTIONS Some appliances are equipped with a polarized plug (one blade is wider than the other).
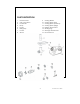
PART DESCRIPTION 1 2 3 4 5 6 7 8 Reverse knob ON / OFF switch Head inlet Body Head Filling tray Pusher Worm 9 10 11 12 13 14 15 16 4 Cutting blade Cutting plate (fine) Cutting plate (medium) Cutting plate (large) Kebbe attachment Sealing ring Sausage attachment Head stopper USK MGR 25959 - 080630
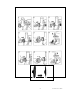
10 A B 5 USK MGR 25959 - 080630
IMPORTANT INFORMATION This appliance is not for professional use. You should follow the requested breaks. Failure to follow this instruction carefully may result in damage to the motor. Please refer to the rating label for the maximum continuous usage time (KB xx min where xx is the maximum usage time). The breaks should last at least 10 minutes. BEFORE FIRST USE It is necessary to clean all accessories (see paragraph "cleaning and care") and to dry them.
• • • • • • • Put the filling tray on the filling neck. Cut the meat into pieces of approximately 30 to 40 mm and put these pieces on the filling tray. Plug in the appliance and switch it on with the ON/OFF switch. Put a tray or a plate under the filling neck to collect the minced meat. Drop the pieces of meat in the filling neck and press with the pusher. Do not press too strongly, as you might block the appliance.
• • • • Place the "Kebbe" attachment, which you will have assembled beforehand, on the shaft of the worm and insert the two arresting pins precisely into the corresponding recesses on the edge of the filling neck. Screw on the sealing ring by turning it clockwise in order to block the unit formed by the worm and the "Kebbe" attachment (fig. 8). We advise you to press the rounded part of the "Kebbe" attachment to make sure that its arresting pins stay in the right position.
Fry the onions and mix all other ingredients with the minced mutton. Fill the “Kebbe” wraps with this mixture and fry the whole. Serve hot. Vegetable or rice filling 250 g stewed broccoli – or 250 g stewed zucchini – or 250 g boiled rice. Fill “Kebbe” wraps and fry them. D) Cookie dough attachment • • • • • Assemble the attachment. To do so, place part A on part B so that one of the shapes on part A matches the opening on part B and that the pin on part B enters one of the holes of part A. (fig. 10).
• • • • • Clean the plastic parts of the appliance with a soft cloth. Never use abrasive products. Never immerse the motor block into water or any other liquid. Clean the accessories with lukewarm water and some mild detergent, rinse and dry. Never put any part of your appliance in the dishwasher.
WARRANTY We suggest that you complete and return the enclosed Product Registration Card promptly to facilitate verification of the date of original purchase. However, return of the Product Registration Card is not a condition of these warranties. You can also fill this warranty card online, at the following address: www.KALORIK.com This KALORIK product is warranted for 1 year from the date of purchase against defects in material and workmanship. This warranty is not transferable.
Representatives can help solve the problem without having the product serviced. If servicing is needed, a Representative can confirm whether the product is under warranty and direct you to the nearest service location. If this is the case, bring the product (or send it, postage prepaid), along with proof of purchase and indicating a return authorization number given by our Consumer Service Representatives, to the nearest authorized KALORIK Service Center (please visit our website at www.KALORIK.
CONSEJOS DE SEGURIDAD Antes de utilizar el aparato, lea detenidamente el modo de empleo, y compruebe que el voltaje de la red eléctrica coincide con el indicado en la placa de características del aparato. Compruebe de vez en cuando que el aparato no esté dañado y no utilice su aparato si el cable o el aparato están dañados por el motivo que sea. Cualquier reparación debe ser realizada por un servicio cualificado competente(*).
Utilice sólo el mortero para empujar la carne hacia el espiral. No utilice los dedos ni otros accesorios en ningún caso. Es indispensable guardar el aparato limpio, ya que está en contacto directo con los alimentos. (*) Servicio técnico cualificado: Servicio técnico del fabricante o del importador o una persona cualificada, reconocida y habilitada a fin de evitar cualquier peligro. En cualquier caso devuelva el aparato al servicio técnico. GUARDE ESTAS INSTRUCCIONES.
PARTES 1 2 3 4 5 6 7 8 Botón inversor Interruptor ON / OFF Orificio de conexión del tubo de entrada Bloque motor Tubo de entrada Bandeja de relleno Mortero Espiral 9 10 11 12 13 14 15 16 15 Cuchilla Disco perforado (fino) Disco perforado (medio) Disco perforado (largo) Accesorios para kebbe Anillo de cierre Accesorio para salchichones Bloqueo del tubo de entrada USK MGR 25959 - 080630
10 A B 16 USK MGR 25959 - 080630
TIEMPO DE UTILIZACIÓN Este aparato no es para usos profesionales. Es necesario realizar paradas a intervalos regulares. Para una utilización óptima de su aparato y evitar el deterioro de su motor, controle el tiempo de utilización continuada máximo indicado en la placa de características (KB xx min. donde xx es la duración máxima). Las pausas de utilización tienen que durar por los menos 10 minutos. ANTES DE LA PRIMERA UTILIZACIÓN Limpie los accesorios (véase párrafo limpieza) y séquelos.
• • • • • • • recomendamos presionen el disco para asegurarse que las uñas de bloqueo queden en una buena posición. Coloque la bandeja de entrada en el tubo de entrada. Corte la carne en pedazos de aproximadamente 30 a 40 mm y vierte estos pedazos en la bandeja de entrada. Enchufe el aparato y enciéndelo con el interruptor ON/OFF. Ponga una bandeja o un plato bajo el tubo de entrada para colectar la carne picada. Vierte los pedazos de carne en el tubo de entrada y empuje con el mortero.
• • • • Ponga el accesorio para kebbe que haya acoplado previamente en el eje del espiral e insierte ambas uñas de bloqueado precisamente en las ranuras correspondientes en la extremidad del tubo de entrada. Atornille el anillo de cierre en el tubo girándola en el sentido de las agujas del reloj para bloquear el conjunto del accesoriopara kebbe y el espiral (Imagen 8). Les recomendamos presionen el accesorio para salchichones contra el disco para que las uñas de bloqueo queden en la buena posición.
Relleno 100 g Carne de cordero 1 ½ cucharada sopera Aceite de oliva 1 ½ cucharada sopera Cebolla picada 1/3 cucharadita Pimiento ½ cucharadita Sal 1 ½ cucharada sopera Harina Sancoche la cebolla y revuelva todos los ingredientes con la carne de cordero (la carne debe ser asada y picada previamente). Rellene los sobres de kebbe y ase el conjunto. Sírvalos calientes.
Sea muy prudente cuando manipule la cuchilla ya que es muy cortante. Si el aparato sigue bloqueado, apáguelo, desenchúfelo y desmóntelo. LIMPIEZA Y MANTENIMIENTO • • • • • • Apague el aparato, desenchufe la clavija eléctrica y dejar enfriar el aparato antes de limpiarlo. Limpie las partes de plástica con un paño húmedo suave. No utilice nunca productos abrasivos. No sumerja nunca el bloque motor en el agua o en cualquier otro líquido. Limpie los accesorios con agua caliente y detergente.
GARANTÍA Le sugerimos rellenen y nos envíen rápidamente la Tarjeta adjunta de Registro de Producto adjunto para facilitar la verificación de la fecha de compra. Por lo tanto, la devolución de esa Tarjeta de Registro de Producto no es una condición imprescindible para la aplicación de esa garantía. Puede también rellenar esa carta de garantía en línea en la dirección siguiente : www.KALORIK.
Si el aparato tuviera un defecto durante el periodo de garantía y más de 30 días después de que se compró, no devuelva el aparato en la tienda donde le compró : a menudo, nuestro Servicio al Consumidor puede ayudar a resolver el problema sin que el producto tenga que ser reparado. Si hace falta una reparación, uno de nuestros representantes puede confirmar si el producto está bajo garantía y dirigirle al servicio post-venta lo más próximo.
www.KALORIK.