Espresso maker Cafetera express EXP 25022 www.KALORIK.
IMPORTANT SAFEGUARDS 1. READ ALL INSTRUCTIONS 2. Check that your mains voltage corresponds to that stated on the appliance. 3. Do not touch hot surfaces. Use handles or knobs. 4. To protect against electrical shock do not immerse cord, plugs, or the appliance in water or other liquid. 5. Close supervision is necessary when any appliance is used by or near children. 6. Unplug from outlet when not in use and before cleaning. Allow to cool before putting on or taking off parts. 7.
17. When removing lime scale, only use special products for the removal of lime scale. Never use ammonia or any other substance that might damage your health. 18. Never use your espresso maker without water in it. 19. Avoid contact with steam, since scalding can occur if care is not taken when steaming milk or any time the steam valve is open. SAVE THESE INSTRUCTIONS POLARIZED PLUG INSTRUCTIONS Some appliances are equipped with a polarized plug (one blade is wider than the other).
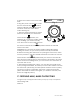
PART DESCRIPTION 1. 2. 3. 4. 5. 6. 7. 8. Carafe Handle Carafe cover Frothing device Steamtube Measuring cup Tank cover Steam knob 9. Indicator 10. Steel mesh 11. Metal funnel 12. Press bar 13. Metal funnel handle 14. Removable shelf 15.
A. BEFORE FIRST USE 1. Remove the coffee maker from the package, and check the accessories according to the list. 2. Clean all the detachable components according to the following section of “CLEANING AND MAINTENANCE”. Then assemble them completely. 3. Ensure the steel mesh place in position. Place the carafe on removable shelf. 4. Operate the appliance without coffee powder in steel mesh. Repeat 2-3 times. B. MAKE ESPRESSO COFFEE 1. Remove the tank cover by turning it in anti-clockwise.
5. Place the carafe on the removable shelf. 6. Plug the power cord into the outlet. Turn the steam knob to position, and the indicator is illuminated, wait for about 2 minutes, there will be coffee flowing out. 7. After the desired quantity of coffee has been obtained, you should turn LOCK I NSERT Fig. 1 steam knob to position, the indicator go out and the coffee maker stops working, your coffee is ready now.
1. Prepare espresso first with container big enough according to the part “B. MAKE ESPRESSO COFFEE”. 2. Fill a jug with desired amount of milk for each cappuccino to be prepared, you are recommended to use whole milk at refrigerator temperature (not hot!). Note: In choosing the size of jug, it is recommend the diameter is not less than 70±5mm, and bear in mind that the milk increases in volume, make sure the height of jug is enough. 3. Turn the steam knob to the position, the indicator will light up. 4.
4. Clean all the detachable attachments in the water and dry thoroughly. CLEANING MINERAL DEPOSITS 1. To make sure that your coffee maker operates efficiently, that internal piping is clean and the flavor of coffee is optimal, you should clean away the mineral deposits left every 2-3 months. 2. Fill the tank with water and descaler to the MAX level (the scale of water and descaler is 4:1, the detail refers to the instruction of descaler.
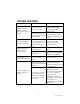
TROUBLE SHOOTING Symptom Carafe leakage water or water leaks out from lid of carafe The metal parts in the tank have rust. Water leaks from the bottom of coffee maker. Cause The carafe is not located properly The level of water in the tank exceeds the scale of MAX. The descaler is not recommended type. It may corrode the metal parts in the tank. There is much water in the drip tray. The coffee maker is malfunction. Corrections Let centreline of carafe aligns with leakage opening of brew basket well.
The coffee maker cannot work any more. The steam cannot froth. The power outlet is not plugged well. The steam ready indicator (green indicator) is not illuminated. The container is too big or the shape is not fit. You have used skimmed milk Plug the power cord into a wall outlet correctly, if the appliance still does not work, please contact with the authorized service facility for repairing. Only after the steam ready indicator (green indicator) is illuminated, the steam can be used to froth.
WARRANTY We suggest that you complete and return the enclosed Product Registration Card promptly to facilitate verification of the date of original purchase. However, return of the Product Registration Card is not a condition of these warranties. You can also fill this warranty card online, at the following address: www.KALORIK.com This KALORIK product is warranted for 1 year from the date of purchase against defects in material and workmanship. This warranty is not transferable.
If the appliance should become defective within the warranty period and more than 30 days after date of purchase, do not return the appliance to the store: often, our Consumer Service Representatives can help solve the problem without having the product serviced. If servicing is needed, a Representative can confirm whether the product is under warranty and direct you to the nearest service location.
CONSEJOS DE SEGURIDAD 1. LEA TODAS LAS INSTRUCCIONES. 2. Antes de utilizar el aparato, compruebe que el voltaje de la red eléctrica coincide con el del aparato. 3. No toque las superficies calientes. Siempre utilice las asas o los botones. 4. Para protegerse contra una descarga eléctrica, no sumerja el aparato o el enchufe en agua o en otros líquidos. 5. Es siempre necesaria la supervisión cercana cuando se utiliza este aparato cerca de niños. Este aparato no debe ser usado por niños. 6.
16. Procure que el aparato no entre en contacto con materiales fácilmente inflamables como cortinas, tejidos, etc., cuando esté en funcionamiento, ya que podría provocar un incendio. 17. Si quiere eliminar la cal del aparato utilice solamente un producto especialmente estudiado para este fin. No utilice amoniaco o cualquier otro producto que pueda perjudicar la salud. 18. No haga funcionar la cafetera express sin agua. 19.
PARTES 1. 2. 3. 4. 5. 6. 7. 8. Jarra Asa Tapa de la jarra Boquilla de vapor Tubo de vapor Taza medidora Tapa del depósito de agua Botón vapor 9. Testigo 10. Red metálica 11. Embudo metálico 12. Barra de presión 13. Asa del embudo metálico 14. Placa amovible 15.
A. ANTES DEL USO 1. Saque la cafetera del embalaje y compruebe que estén todos los accesorios. 2. Limpie todos los accesorios amovibles según las instrucciones del párrafo “LIMPIEZA Y MANTENIMIENTO”. Luego puede asemblarlo todo. 3. Compruebe que la red metálica esté bien posicionada. Ponga la jarra en la placa amovible. 4. Ponga el aparato en marcha sin café en la red metálica. Repita 2 o 3 veces. B. HACER CAFÉ EXPRESSO 1.
6. Gire el botón de vapor en la posición . El testigo luminoso se encenderá. Espere aproximadamente dos minutos, el café va a pasar. 7. Una vez obtenida la cantidad de café deseada, gire el botón vapor en la posición , el testigo luminoso se apagará y el aparato deja de funcionar, su café está listo. Remueva la jarra y gire OFF el botón vapor en posición RELEASE para evacuar el vapor que queda en el depósito.
3. Gire el botón vapor en posición , el testigo luminoso se encenderá. 4. Insierte el boquilla de vapor de dos centímetros en la leche, después de aproximadamente dos minutos, el vapor saldrá de la boquilla de vapor. Mueva la taza arriba y abajo para obtener una espuma uniforme. 5. Una vez conseguida la espuma, gire el botón vapor en posición para dejar de espumar. Remueva la jarra y gire el botón vapor OFF en posición RELEASE para evacuar el vapor que queda en el depósito.
LIMPIAR LOS RESIDUOS MINERALES 1. Para asegurarse que su aparato funcione correctamente, que los tubos internos estén limpios y que el gusto del café esté bueno, limpie el residuo mineral cada dos o tres meses. 2. Llene el depósito con agua y desincrustante hasta el nivel MAX (una dosis de desincrustante por cuatro dosis de agua). Les recomendamos utilicen un desincrustante « doméstico », puede utilizar ácido cítrico (disponible en farmacías o en tiendas) en vez del desincrustante. 3.
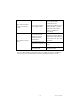
RESOLUCION DE PROBLEMAS Síntomas La jarra flue o agua flue de la tapa de la jarra Causa La jarra no está colocado correctamente El nivel de agua en el depósito está por encima del nivel MAX. Las partes El desincrustante no metálicas del conviene. Puede depósito están corroer las partes herrumbrosas.
El café está guardado en un lugar caliente y húmedo. Puede podrir. El aparato no funciona. El aparato no está bien enchufado El testigo luminoso de vapor (luz verde) no está encendido. La boquilla de vapor no hace espuma. El recipiente es demasiado grande o su forma no conviene. Ha utilizado leche desnatada. Utilice café fresco, y guarde el café en un lugar fresco y seco. Después de abrir el paquete de café, ciérrelo correctamente y guárdelo en la nevera para mantenerlo fresco.
GARANTÍA Le sugerimos rellenen y nos envíen rápidamente la Tarjeta adjunta de Registro de Producto adjunto para facilitar la verificación de la fecha de compra. Por lo tanto, la devolución de esa Tarjeta de Registro de Producto no es una condición imprescindible para la aplicación de esa garantía. Puede también rellenar esa carta de garantía en línea en la dirección siguiente : www.KALORIK.
derechos que varían de un estado a otro y algunos derechos pueden variar de un estado a otro. Si el aparato tuviera un defecto durante el periodo de garantía y más de 30 días después de que se compró, no devuelva el aparato en la tienda donde le compró : a menudo, nuestro Servicio al Consumidor puede ayudar a resolver el problema sin que el producto tenga que ser reparado.
K080204 www.KALORIK.