INDOOR SMOKELESS GRILL PARRILLA SIN HUMO PARA INTERIORES EN……....2 ES……...17 GR 45386 120V~60Hz 1500W (12.5A) www.KALORIK.
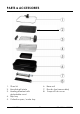
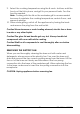
PARTS & ACCESSORIES 1. Glass lid 2. Nonstick grill plate 3. Heating element with detachable cord 4. Drip tray 5. Collection pan / water tray www.KALORIK.com 6. Base unit 7. Electric fan (removable) 8.
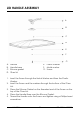
LID HANDLE ASSEMBLY A B C D E F G A. B. C. D. Handle Handle base Silicone gasket Glass lid E. Plastic washer F. Metal washer G. Screw 1. Insert the Screw through the Metal Washer and then the Plastic Washer. 2. Insert the Screw and the washers through the bottom of the Glass Lid. 3. Place the Silicone Gasket on the threaded end of the Screw on the top of the Glass Lid. 4. Place the Handle Base over the Silicone Gasket. 5. Thread the Handle onto the Screw and tighten using a Phillips-head screwdriver.
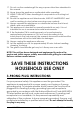
IMPORTANT SAFEGUARDS When using electrical appliances, basic safety precautions should always be followed, including the following: 1. 2. 3. 4. 5. 6. 7. 8. 9. 10. 11. 12. 13. 14. 15. 16. READ ALL INSTRUCTIONS BEFORE USE. Never immerse the main unit housing, which contains electrical components and heating elements, in water. Do not rinse under the tap. To avoid electrical shock, do not put liquid of any kind into the main unit housing containing the electrical components.
17. Do not use the smokeless grill for any purpose other than described in this manual. 18. Never leave the appliance unattended while operating. 19. WEAR OVEN MITTS when handling hot components or touching hot surfaces. 20. Should the appliance emit black smoke, UNPLUG IMMEDIATELY and wait for smoking to stop before removing oven contents. 21. Always operate the appliance on a horizontal surface that is level, stable, and noncombustible. 22. This appliance is intended for normal household use only.
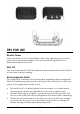
SHORT CORD INSTRUCTIONS A short power supply cord is provided to reduce the hazards resulting from becoming entangled in or tripping over a longer cord. KNOW YOUR SMOKELESS GRILL Grill your favorite foods without any smoke with your new Smokeless Grill. Functioning as a traditional grill but designed with a built-in fan and a silicone-sealed lid, this unit reduces smoke and visible vapors usually associated with grilling to a minimum.
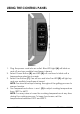
USING THE CONTROL PANEL 1. Plug the power cord into an outlet. Blue LED Light (A) will blink on and off and one audible tone/beep is heard. 2. Select Power Button (B), and LED (A) will continue to blink until a temperature selection is made. 3. Select Fan Button (C). Fan will run and blue Fan LED (D) will light up and one audible tone/beep is heard. NOTE: Fan should be kept running throughout the grilling process to prevent smoke. 4.
5. Once the temperature is reached, the LED light below the Power button becomes a solid red. 6. When you are finished grilling, press the Power and Fan Buttons to shut down the Unit. Unplug the Power Cord and allow unit to cool fully before disassembling for cleaning. BEFORE THE FIRST USE • • • • • Remove all packing materials, labels stickers and literature. Wipe the appliance with a damp cloth.
. Select the cooking temperature using the + and - buttons, add the food, put the lid in place, and grill to your personal taste. Turn the food as needed. Note: Cooking with the lid on the smokeless grill is recommended because it maintains the cooking temperature, seals in flavor, and prevents splatter. 10. When done grilling, switch off the appliance by turning the knob and remove the plug from the wall outlet.
TIPS FOR USE Electric Power If the electrical circuit is overloaded with other appliances, your new unit may not operate properly. This unit should be operated on a dedicated electrical circuit. Shut-Off You can manually shut off the appliance by pressing the Power Button at any time during cooking. Electromagnetic Fields This appliance complies with all standards regarding electromagnetic fields. If handled properly and according to the instructions in this user manual, the appliance is safe to use.
• • • Similar to a stove top frying pan, grease from high-fat foods, such as bacon or sausage, may splatter on the countertop. Protect the countertop as necessary. To prevent scratching the coating, use only nonmetallic utensils. Do not cut food on the grill plate using sharp utensils, such as forks or knives, that can scratch the cooking surface. Do not use steel wool or other metal pads. They could leave coarse scratches. Always rinse thoroughly and dry immediately with a soft towel. www.KALORIK.
GRILLING SUGGESTIONS The table below shows some food that can be cooked on the grill along with suggested cooking times for each. Keep in mind that grilling times may vary depending on the type of food used, its size, thickness and current temperature, as well as personal preference.
When preparing kebabs, soak bamboo or wooden skewers in water to prevent them from getting scorched during grilling. Do not use metal skewers. • CLEANING AND MAINTENANCE CAUTION! Wait for all components to cool thoroughly after use before disassembling. Always handle hot components with oven mitts while cooking or hot. • • • • • • Before cleaning, be sure to unplug the cord from the outlet. If necessary, wipe the cord with a damp cloth. Allow the appliance to cool completely before cleaning.
TROUBLESHOOTING If your appliance is not working properly: Problem Appliance is not turning on. Appliance is taking too long to heat or not heating enough. Food is undercooked or overcooked Electric fan is not working Possible cause • • • • www.KALORIK.com There is no power going into the appliance The appliance may not be able to draw enough operating power from the outlet.
WARRANTY We suggest that you complete and return the enclosed Product Registration Card promptly to facilitate verification of the date of original purchase. However, return of the Product Registration Card is not a condition of these warranties. You can also fill out this warranty card online, at the following address: www.KALORIK.com This KALORIK product is warranted in the U.S.A. and in Canada for 1 year from the date of purchase against defects in material and workmanship.
If this is the case, bring the product, or send it, postage prepaid by the user (all Kalorik customers are responsible for the initial shipment back to the warranty center), along with proof of purchase and a return authorization number indicated on the outer package, given by our Customer Service Representatives. Send to the authorized KALORIK Service Center (please visit our website at www.KALORIK.com or call our Customer Service Department for the address of our authorized KALORIK Service Center).
PARTES Y ACCESORIOS 1. Tapa de vidrio 2. Placa antiadherente de la parrilla 3. Elemento calentador con cable de alimentación desmontable 4. Bandeja de goteo www.KALORIK.com 5. Recipiente colector/bandeja para agua 6. Base de la unidad 7. Ventilador eléctrico (extraíble) 8.
MONTAJE DE ASA DE LA TAPA A B C D E F G A. B. C. D. Asa Base del asa Junta de silicona Tapa de vidrio E. Arandela de plástico F. Arandela de metal G. Tornillo 1. Inserte el tornillo a través de la arandela de metal y luego la arandela de plástico. 2. Inserte el tornillo y las arandelas a través de la parte inferior de la tapa de vidrio. 3. Coloque la junta de silicona en el extremo roscado del tornillo en la parte superior de la tapa de vidrio. 4.
SALVAGUARDIAS IMPORTANTES Cuando utilice aparatos eléctricos, siempre debe seguir las precauciones básicas de seguridad, incluyendo las siguientes: 1. 2. 3. 4. 5. 6. 7. 8. 9. 10. 11. 12. 13. 14. LEA TODAS LAS INSTRUCCIONES ANTES DE USAR. Nunca sumerja la carcasa de la unidad principal en agua, ya que contiene componentes eléctricos y elementos calefactores. No enjuague bajo el grifo.
15. Este artefacto no está diseñado para funcionar a través de un temporizador externo o con un sistema de control remoto independiente. 16. No haga funcionar el aparato sobre o cerca de materiales combustibles, como manteles y cortinas. 17. No utilice la Parrilla Sin Humo para ningún otro propósito que no sea el descrito en este manual. 18. Nunca deje el aparato en funcionamiento desatendido. 19. UTILICE LOS GUANTES PARA HORNO cuando manipule componentes calientes o toque superficies calientes. 20.
INSTRUCCIONES DEL CONECTOR DE 3 CLAVIJAS Conecte el aparato a tierra para su seguridad personal. Este aparato está equipado con un cable de alimentación que tiene un enchufe de conexión a tierra de 3 clavijas. Para minimizar el posible riesgo de descarga eléctrica, el cable debe enchufarse en una toma de corriente en la pared de tipo conexión a tierra de 3 clavijas, de acuerdo con la última edición del Código Eléctrico Nacional ANSI/NFPA 70 y todos los códigos y ordenanzas locales.
USO DEL PANEL DE CONTROL 1. Enchufe el cable de alimentación a una toma de corriente. La luz LED azul (A) se encenderá y apagará y se escuchará un tono/pitido audible. 2. Pulse el botón de encendido (B) y el LED (A) continuará parpadeando hasta que se realice una selección de temperatura. 3. Pulse el botón del ventilador (C). El ventilador funcionará y el LED azul del Ventilador (D) se encenderá y se escuchará un tono/pitido audible.
mantener los alimentos calientes, fije la temperatura entre 220°F y 250°F. 5. Una vez que se alcanza la temperatura, la luz LED debajo del botón de Encendido se vuelve de color rojo sólido. 6. Cuando haya terminado de asar a la parrilla, presione los botones de Encendido y Ventilador para apagar la unidad. Desenchufe el cable de alimentación y deje que la unidad se enfríe completamente antes de desmontarla para limpiarla.
INSTRUCCIONES DE FUNCIONAMIENTO 1. Coloque el aparato sobre una superficie estable y resistente al calor. Mantenga alejado de objetos inflamables. 2. Monte la unidad. Consulte la sección Partes y Accesorios para ver el orden de los elementos a medida que se ensamblan. 3. Agregue aproximadamente 2 tazas de agua al recipiente colector. 4. Asegúrese de que la bandeja de goteo se deslice en la base del aparato. 5. Deje un amplio espacio de aire alrededor del aparato para facilitar el flujo de aire. 6.
RETIRADA DEL VENTILADOR ELÉCTRICO: Cuando esté limpiando el base de la unidad con agua y detergentes, siempre retire el ventilador eléctrico. Gire la base de la unidad, deslice y retire la cubierta del ventilador tirando de la base. Levante el ventilador de la base de la unidad lentamente y desconecte el enchufe de dos clavijas en la base de la Parrilla Sin Humo. Cuando vuelva a colocar el ventilador en la base, inserte la conexión de dos clavijas en el receptáculo.
Campos electromagnéticos Este aparato cumple con todas las normas relativas a los campos electromagnéticos. El aparato es completamente seguro si se manipula correctamente y de acuerdo con las instrucciones de este manual del usuario. • • • • • • Tenga cuidado de no transferir los gérmenes de la carne cruda a la carne cocida. Use utensilios y platos separados para la carne cruda y cocida. Siempre adobe en un plato no metálico bien cubierto y dé la vuelta a la comida de vez en cuando.
SUGERENCIAS PARA ASAR A LA PARRILLA La siguiente tabla muestra algunos alimentos que se pueden cocinar a la parrilla junto con los tiempos de cocción sugeridos para cada uno. Tenga en cuenta que los tiempos de cocción pueden variar según el tipo de alimento utilizado, su tamaño, grosor y temperatura actual, así como las preferencias personales.
demasiado gruesa (aproximadamente 0.5 pulg./1.5 cm), lo que ayuda a mantener la carne jugosa. La carne tierna es la más adecuada para asar. La carne estará más tierna si es marinada durante la noche. Cuando rocíe los alimentos con la marinada, use solo un poco de aceite y cepille la marinada ligeramente sobre la comida para evitar el exceso de humo. Las salchichas tienden a reventarse cuando se asan. Para evitarlo, realice algunos cortes a lo largo de la salchicha.
• de vinagre). Los residuos de alimentos persistentes y apelmazados se pueden eliminar con un raspador de cerámica en la superficie del vidrio. Vuelva a montar el aparato. NOTA: Cualquier otro servicio debe ser realizado por un representante de servicio autorizado. SOLUCIÓN DE PROBLEMAS Si su aparato no funciona correctamente: Problema Causa posible • El aparato no se enciende. El aparato tarda demasiado en calentarse o no calienta lo suficiente.
GARANTÍA Le sugerimos rellenen y nos envíen rápidamente la Tarjeta de Registro de Producto adjunta para facilitar la verificación de la fecha de compra. Por lo tanto, la devolución de esa Tarjeta de Registro de Producto no es una condición imprescindible para la aplicación de esa garantía. Puede también rellenar dicha tarjeta de garantía en línea en la dirección siguiente: www.KALORIK.
donde le compró: a menudo, nuestro Servicio al Consumidor puede ayudar a resolver el problema sin que el producto tenga que ser reparado. Si hace falta una reparación, uno de nuestros representantes puede confirmar si el producto está bajo garantía y dirigirle al servicio post-venta más próximo.
For questions please contact: KALORIK Customer Service Department Team International Group of America Inc. 1400 N.W 159th Street, Suite 102 Miami Gardens, FL 33169 USA Toll Free: +1 888-521-TEAM / +1 888-KALORIK Model GR 45386 www.KALORIK.com User manual content and recipes courtesy of Team International Group – Do not reproduce without consent of the authors - All rights reserved. www.KALORIK.