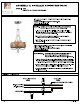
ASSEMBLY & INSTALLATION INSTRUCTIONS MODEL: 5409 WINDSOR 4LT OVAL CHANDELIER ALCOA ELECTRICAL 4 COMPONENT INSTRUCTIONS STEP 1: Attach mounting plate to outlet box with the (2} 8/32" 3/4" OT Not UBS) screws. Fasten Nipple into mounting plate so that they ~~ BLACK & SMOOCH 0 ROUND WIRES extend away from the ceiling when the mounting plate is WIRES installed. Lock in place using the hex nut and washer PANG SLATE, provided.
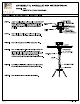
ASSEMBLY & INSTALLATION INSTRUCTIONS MODEL: 5409 WINDSOR 4LT OVAL CHANDELIER ee COMPONENTS ASSEMBLY INSTRUCTIONS GLASS DIFFUSENESS T T FLAT BAR NL L NUT STEP 7: Chaff glass diffuses fo the upper fixture as shown. Secure with fiat bar provided. Lock in place using the ball nuts. BALL MN 60W BULB (NOT INCLUDED] ICA SHADE Tf a a FRAME + + STEP B: Insert the mica shade fo the main fixture frame. Attach the main frame to the upper part of the fixture. Secure with ball nuts provided. STEP 9: Install bulbs.
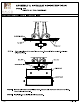
ASSEMBLY & INSTALLATION INSTRUCTIONS 4 MODEL: 5409 EK L con WINDSOR 4LT OVAL CHANDELIER COMPONENTS ASSEMBLY INSTRUCTIONS WASHER: FINIAL STEP 10: Insert the washer and attach the finial to the main fixture. FOR LIGHTING MAINTENANCE: Regular cleaning of fixtures with proper and gentle care using a soft duster, soft lint-free or damp cloth is recommended. Refrain from using harsh cleaning liquids that may cause chemical reaction on the hand painted finishes.
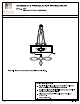
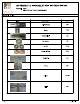
MODEL: 5409 WINDSOR 4LT OVAL CHANDELIER Alcoa ASSEMBLY & INSTALLATION INSTRUCTIONS PARTS LIST IMAGE PARTS NAME ary X-9 Parts Bag 1PC Screw RFCs Threaded Nipple 1PC Star Washer 1PC Hex Nut PCs Open-able Chain PCs Chain (47t) 1PC Canopy 1PC Diffuse 1PC/ Set Finial 1PC Page 5 ‘www _alcoholism