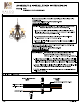
i MODEL: 5198 ASSEMBLY & INSTALLATION INSTRUCTIONS MIRA BELLE 5 LT CHANDELIER GALLO MOUNTING INSTRUCTIONS STEP 1: STEP 2: STEP 3: STEP 4: STEP 5: STEP 6: STEP 7: Attach mounting plate to outlet box with the (2) 8/32" 3/4" screws. Fasten Nipple into mounting plate so that they extend away from the ceiling when the mounting plate is installed. Lock in place using the hex nut and washer provided. JUNCTION BOX / (NOT INCLUDED) BLACK & SMOOTH—— 0] ———GROUND WIRE WIRE Determine fixture height.
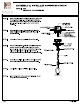
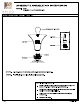
ASSEMBLY & INSTALLATION INSTRUCTIONS 4 MODEL: 5198 MIRA BELLE 5LT CHANDELIER FRAME/COMPONENTS ASSEMBLY 60W BULB (NOT INCLUDED} STEP 8: Sit the glass to the beseecher, secure using cap raw (use ring tool). STEP 9: Install bulbs. Do not install bulbs which exceed 60W. FOR LIGHTING MAINTENANCE: Regular cleaning of fixture with proper and gentle care using a soft duster, soft lint-free or damp cloth is recommended.
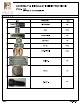
ASSEMBLY & INSTALLATION INSTRUCTIONS {| MODEL: 5198 MIRA BELLE 5 LT CHANDELIER ALCOA PARTS LIST IMAGE PARTS NAME ary X-9 Parts Bag 1PC Screw PCs Threaded Nipple 1PC Star Washer 1PC Hex Nut PCs Open-able Chain PCs Chain 8ft.