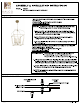
ASSEMBLY & INSTALLATION INSTRUCTIONS 4 MODEL: 509352 SITTER 19 INCH 6 LIGHT PENDANT GALLO KNOCK DOWN ASSEMBLY STEP 1: Carefully pull the wire and screw the fixture loop to the main fixture as shown. ( Make sure the wire is not pinching between them } FOR LIGHTING MAINTENANCE: Regular cleaning of fixture with proper and gentle care using a soft duster, soft lint-free or damp cloth is recommended. Refrain from using harsh cleaning liquids that may cause chemical reaction on the hand painted finishes.
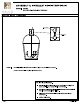
ASSEMBLY & INSTALLATION INSTRUCTIONS £ MODEL: 508352 WALED SITTER 19 INCH 6 LIGHT PENDANT ELECTRICAL / MOUNTING INSTALLATION STEP 2: Attach mounting plate to outset box with the (2} 8/32"x 3/4" ——lunchbox screws. Fasten Nipple into mounting plate so that they HACKER S o “:;W extend away from the ceiling when the mounting plate is WRE O installed. Lock in place using the hex nut and washer G PLATE provided. X 304" SCREW WHITE &RBI NUTRIENT WRE ROUND BOLT -THREADED NILE STEP 3: Determine fixture height.
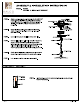
‘£ MODEL: 509352 SITTER 19 INCH 6 LIGHT PENDANT ASSEMBLY & INSTALLATION INSTRUCTIONS ALCOA ?A RTS LIST IMAGE PARTS NAME ary X-9 Parts Bag 1PC Screw PCs Threaded Nipple 1PC Star Washer 1PC Hex Nut PCS flfi Open-able Chain PCS Chain 4ft 1PC Canopy 1PC ” Candle Cover PCS Page 4 ‘www gyrfalcon