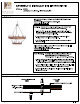
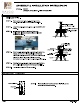
ASSEMBLY & INSTALLATION INSTRUCTIONS MODEL: 505553 LANDLESS 18 LIGHT 2-TIER CHANDELIER ALCOA CEILING BRACE OPTIONS "METHOD A" PLATE HICKEY OUTLET BOX HEX NUT 8 LOG WASHER Brace is directly on top of the outlet box and not accessible). Using a 1/8” drill bit, per-drill {4) holes into the wood brace through tha {4) hole patter in the outlet box. {Outlet box is shown as a cutaway for Clarity). Secure the hickey to the brace with (4) #8 x screws.
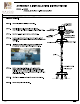
4 MODEL: 505553 ASSEMBLY & INSTALLATION INSTRUCTIONS EAL OD LANDLESS 18 LIGHT 2-TIER CHANDELIER KNOCKDOWN ASSEMBLY STEP 1: Hook all the open-able chain to the main fixture loop as shown. LIGHTING MAINTENANCE: Regular cleaning of fixture with proper and gentle care using a soft duster, soft lint-free or damp cloth is recommended. Refrain from using harsh cleaning liquids that may cause chemical reaction on the hand painted finishes. Always refer to the Assembly Instruction before removing any components.
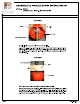
ASSEMBLY & INSTALLATION INSTRUCTIONS MODEL: 505553 nd i i LANDLESS 18 LIGHT 2-TIER CHANDELIER ELECTRICAL / MOUNTING INSTALLATION 1 PENDANT OPTION : STEP: Assemble nipple and collar loop to cast hickey. UNCTION BOX / (NOT INCLUDED) STEP: Determine fixture height. Make adjustment if needed. BLACK & O Attach chain to fixture loop and collar loop using open-able chain. SMOOTH WIRE T HICKEY ROUND WIRE STEPS: Pass the collar loop ring and canopy, over the chain.
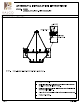
ASSEMBLY & INSTALLATION INSTRUCTIONS 4 MODEL: 505553 LANDLESS 18 LIGHT 2-TIER CHANDELIER ALCOA ELECTRICAL / MOUNTING INSTALLATION 2 SEMI-FLUSH OPTION : STEP 1: Remove the cover plate, collar loop/ring and the open-able chain / link to make the item semi-fish. OPEN-ABLE CHAIN LIAR LOOP / RING STEP 2: Attach mounting plate to outlet box with the (2) 8/32"x 3/4" © ! S Crows. STEP 3: Install safety cable to ceiling beam Make sure ceiling beam is strong enough to support 4 times the weight of the fixture.
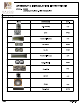
ALCOA LANDLESS 18 LIGHT 2-TIER CHANDELIER ASSEMBLY & INSTALLATION INSTRUCTIONS MODEL: 505553 PARTS LIST IMAGE PARTS NAME QTY.