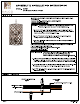
ASSEMBLY & INSTALLATION INSTRUCTIONS # MODEL: 504854 WHIT TAKER 8 LIGHT FOYER ALCOA CEILING BRACE OPTIONS "METHOD A" HICKEY OUTLET BOX HEX NUT & LOCK WASHER Brace is directly on top of the outlet box and not accessible). Using a 1/8" drill bit, per-drill (4) holes into the wood brace through the (4) hole patter in the outlet box. (Outlet box is shown as a cutaway for Clarity). Secure the hickey to the brace with (4) #8 x screws.
ASSEMBLY & INSTALLATION INSTRUCTIONS MODEL: 504854 WHIT TAKER 8 LIGHT FOYER ALCOA KNOCKDOWN ASSEMBLY STEP 1: Attach the fixture loop to the main fixture. FOR LIGHTING MAINTENANCE: Regular cleaning of fixture with proper and gentle care using a soft duster, soft lint-free or damp cloth is recommended. Refrain from using harsh cleaning liquids that may cause chemical reaction on the hand painted finishes. Always refer to the Assembly Instruction before removing any components. HANDLE WITH CARE.
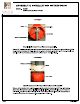
ASSEMBLY & INSTALLATION INSTRUCTIONS 4 MODEL: 504854 REEL Oo WHIT TAKER 8 LIGHT FOYER ELECTRICAL / MOUNTING INSTALLATION STEP 2: Assemble nipple and collar loop to cast hickey. STEP 3: Determine fixture height. Make adjustment if needed. Attach chain to fixture loop and collar loop using open-able chain. / prosaically STEP 4: Pass the collar loop ring and canopy, over the chain.
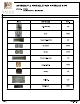
WHIT TAKER 8 LIGHT FOYER ASSEMBLY & INSTALLATION INSTRUCTIONS MODEL: 504854 PARTS LIST IMAGE PARTS NAME QTY. X-14 Parts Bag 1PC Screw PCS | HE Threaded Nipple (Short) 1p¢ Star Washer PCS Hex Nut PCS Threaded Nipple (Long) 1PC Open-able Chain PCS Canopy 1PC Chain 8ft.