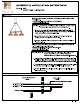
ASSEMBLY & INSTALLATION INSTRUCTIONS MODEL: 4640 RODEO DRIVE 3 LIGHT ISLAND Alcoa MOUNTING/ELECTRICAL STEP 1: STEP 2: STEP 3: STEP 4: STEP 5: STEP 6: STEP 7: Fasten nipple into mounting plate so that they extend A) away from the ceiling when the mounting plate is installed. BLAG & SMOOTH O GROUND WIRES Lock in place using the hex nut & washer provided. BIT PLATE X34" SCREW ‘WHITE & RIE ur WIRES UND BOLT THREADED NIPPLE Attach mounting plate to outlet box with the (2) 8-32 x EX NUT AND WASHER 3" screws.
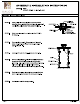
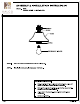
ASSEMBLY & INSTALLATION INSTRUCTIONS MODEL: 4540 RODEO DRIVE 3 LIGHT ISLAND ALCOA COMPONENT ASSEMBLY BEECHER TICKET TCI CAP RAW 100W BULB (NOT INCLUDED} STEP 8: Attach the shade to the beseecher and secure with cap raw. STEP ©: Install bulb, do not use bulbs that exceed 100 Watts. FOR LIGHTING MAINTENANCE: Regular cleaning of fixture with proper and gentle care using a soft duster, soft lint-free or damp cloth is recommended.
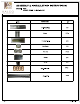
Es ASSEMBLY & INSTALLATION INSTRUCTIONS MODEL: 4640 RODEO DRIVE 3 LIGHT ISLAND PARTS LIST IMAGE PARTS NAME a X-9 Parts Bag IPC Screw 2 PCs Threaded Nipple TPC Star Washer 1pC Hex Nut PCs Canopy 1PC Re cap 1PC 0 000 Open-Able Chain PCs Chain (4 ft) PCs Page 4 ‘www.