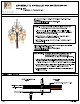
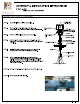
ASSEMBLY & INSTALLATION INSTRUCTIONS MODEL: 4290 TRANSCRIBE 12LT CHANDELIER ALCOA CEILING BRACE OPTIONS " METHOD A" SCREW = PLATE HICKEY OUTLET BOX HEX NUT & LOCK WASHER Brace is directly on top of the outlet box and not accessible). Using a 1/8" drill bit, per-drill (4) holes into the wood brace through the (4) hole pattern in the outlet box. (Outlet box is shown as a cutaway for Clarity). Secure the hickey to the brace with (4) #8 x screws.
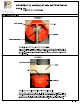
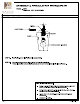
ASSEMBLY & INSTALLATION INSTRUCTIONS MODEL: 4290 TRANSCRIBE 12LT CHANDELIER ALCOA KNOCKDOWN INSTRUCTION ASSEMBLY IDLE PART STEP 2: Pull the wire in the center stem, hold the wire up while screwing it to the main fixture as shown.
ASSEMBLY & INSTALLATION INSTRUCTIONS MODEL: 4290 TRANSCRIBE 12LT CHANDELIER KNOCKDOWN INSTRUCTION ASSEMBLY IN FIXTURE STEM IDLE FINIAL STEP 3: Insert the middle finial and secure using the center finial to the main fixture as shown.
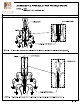
4 MODEL: 4290 TRANSCRIBE 12LT CHANDELIER KALE ASSEMBLY & INSTALLATION INSTRUCTIONS FRAME/COMPONENTS ASSEMBLY STEP 4: STEPS: STEP 6: STEP: STEPS: STEPS: STEP 10: STEP 11: Assemble nipple and collar loop to cast hickey. Determine fixture height. Make adjustment if needed. Attach chain to fixture loop and collar loop using open-able chain. Pass the collar loop ring and canopy, over the chain.
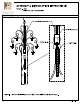
ASSEMBLY & INSTALLATION INSTRUCTIONS MODEL: 4290 TRANSCRIBE 12LT CHANDELIER GALLO FRAME/COMPONENTS ASSEMBLY GIMBALS: GLASS screwiness» — GALS! 100W BULB (NOT INCLUDED) STEP 12: Install bulbs. Do not install bulbs which exceed 100W. STEP 13. Use glass screws to secure glass. Line up the hole with gimbals hole. Thread in one glass screw halfway and repeat for the other screws. Then finally tighten all screws.
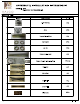
MODEL: 4290 TRANSCRIBE 12LT CHANDELIER ASSEMBLY & INSTALLATION INSTRUCTIONS ALL © PARTS LIST IMAGE PARTS NAME Qry. X-14 Parts Bag 1PC Screw PCs Threaded Nipple {Short} 1PC Star Washer PCs Hex Nut PCs Threaded Nipple (Long) 1PC Canopy / Chain 8Ft.