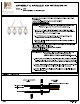
ASSEMBLY & INSTALLATION INSTRUCTIONS MODEL: 2635 MONTGOMERY 4 LIGHT ISLAND CEILING BRACE OPTIONS "METHOD A" HEX NUT 3 LOCK WASH! Brace is directly on top of the loutish box and not accessible). Using a 1/8” drill bit, per-drill {4) holes into the wood brace through the (4) hole pattern in the outlet box. {Outlet box is shown as a cutaway for Clarity). Secure the hickey to the brace with (4) #8 x screws. The wire way opening should mount as shown, between the outlet box and 2 mounting flanges.
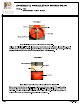
ASSEMBLY & INSTALLATION INSTRUCTIONS MODEL: 2635 Linton MONTGOMERY 4 LIGHT ISLAND ELECTRICAL / MOUNTING INSTALLATION STEP 1: STEP 2: STEP 3: STEP 4: STEP 5: STEP 6: STEP 7: JUNCTION BOX NOT INCLUDED) Assemble nipple and collar loop to cast hickey. Determine fixture height. Make adjustment if needed. Attach chain to fixture loop and canopy loop using open-able chain. Pass the collar loop ring and canopy, over the chain.
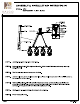
ASSEMBLY & INSTALLATION INSTRUCTIONS MODEL: 2635 MONTGOMERY 4 LIGHT ISLAND ALCOA COMPONENT ASSEMBLY CRYSTALS CRYSTAL CRYSTAL C STEP 8: Attach the decorative crystals as shown. STEP 9: Insert the candle cover to the socket. STEP 10: Install bulbs, do not use bulbs that exceed 60 Watts. FOR LIGHTING MAINTENANCE: Regular cleaning of fixture with proper and gentle care using a soft duster, soft lint-free or damp cloth is recommended.
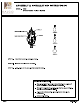
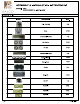
i a ASSEMBLY & INSTALLATION INSTRUCTIONS MODEL: 2635 MONTGOMERY 4 LIGHT ISLAND ALCOA PARTS LIST PARTS NAME QTY. X-14 Parts Bag 1PC Screw PCS wig Threaded Nipple (Short) 1PC Star Washer PCS Hex Nut PCS Threads Nipple (Long) 1PC Open-tabla Chain PCS Candle Cover 4 PCS Canopy 1PC Chain (8ft) PCs RS CAP 1PC Crystal A PCS Crystal B PCS Crystal C PCS Page § ‘www.kalco.