
Installation Guide
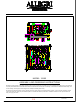
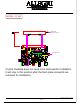
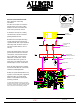
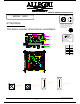
Table Of Contents

WARNING
Electrical Danger
Turn Power Off
All electrical components must be
installed by a licensed electrician in
accordance with the National
Electric code and the appropriate
local electrical codes.
c
R
WWW.ALLEGRICRYSTAL.COM
800-525-2655
1-Ceiling
Junctions Box.
8-Crystal shade
6-Support bars
5-Decorative nuts x 2.
4-Flush Plate
mounting screws x 4.
3-Cross bar studs x 2.
2-Cross bar with
2 screws
7-Holes x 4.
P.4
INSTALLATION INSTRUCTIONS:
Note, this fixture comes fully
assembled.
An extra set of hands are needed to
hold the fixture close to the ceiling
while the electrical connections are
made and crystal shade is fixed.
A-Install the cross bar #2 to ceiling
Junction box#1, with the 2 studs#3
pointing towards the floor.
B-Remove the Flush plate mounting
screws from fixture and release the
crystal shade#8. Slide crystal shade#8
all the way down the fixture and let it
rest on the bottom diffuser. (do not
remove)
C-Move the whole fixture close to the
junction box and make the electrical
connections, connect fixture smooth
wire to white wire, connect fixture
ribbed wire to black wire, connect
fixture bare silver wire "ground" to
green wire. Use plastic wire nuts and
electrical tape to secure connections.
D-Fix the flush plate#4 to the studs#3
and secure them with the 2 decorative
nuts#5 then install light bulbs.
E-Slide the crystal shade#8 all the way
up and fix it over flush plate, align flush
plate holes with the crystal shade
holes#7 and install the 4 flush plate
mounting screws#4.
To replace burnt light bulbs remove 4 flush mount
mounting screws#4. slide crystal shade#8 down (do
not remove). change bulbs and slide crystal shade
back up and secure it with mounting screws#4.