
Manual


14
Important Safety Information
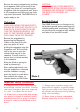
18. When preparing to fire, be sure that
the area behind the slide is free of
obstructions (watch your thumb) as the
slide will move back sharply upon firing.
19. Never drink alcoholic beverages or
take drugs before or during shooting as
your vision and judgment can be serious-
ly impaired, making your gun handling
unsafe.
20. Always seek a doctor’s advice if you
are taking medication to be sure you are
fit to shoot and handle a firearm safely.
21. Always wear ear protection when
shooting, especially on a range. Without
ear protection, the noise of firing can
lead to cumulative long-term and perma-
nent hearing loss.
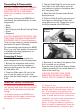
6. Removal of the barrel (see photos#4 &
#5) is carried out as follows:
Push the rear of the Recoil Spring Guide
slightly forward with the thumb and lift it
clear of the recoil lug.
CAUTION: PROTECT EYES WHEN
REMOVING THE RECOIL SPRING
GUIDE. RECOIL SPRING IS UNDER
TENSION AND MAY FLY OFF GUIDE
AND CAUSE INJURY!
7. Carefully remove Recoil Spring Guide
with Recoil Spring from slide (see photo #4).
NOTE: DO NOT ATTEMPT TO DISMAN-
TLE THE RECOIL SPRING ASSEMBLY.
THIS IS A FACTORY ASSEMBLED COM-
PONENT. THE RECOIL SPRING IS
DESIGNED TO WORK ONE WAY ONLY.
THE SMALLER DIAMETER END MUST
BE AGAINST THE FLANGE ON THE
REAR OF THE RECOIL SPRING GUIDE.
IMPROPER REASSEMBLY WILL CAUSE
DAMAGE TO THE FIREARM AND CAUSE
INJURY TO THE USER.
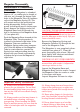
8. Grasp recoil lug of Barrel and push it
slightly forward, then lift and pull it rear-
ward out of the slide. (see photo #5)
Reassembly (Except PM Series)
First, assemble the slide components
reversing the order in which they were
dismantled. Then, before installing the
Slide onto the Frame, do the following:
Make sure that the Recoil Guide Rod
and Spring are parallel to the slide rails
and not off to one side. Note: Be sure
that the smaller diameter end of the
Recoil Spring is against the flange on
the rear of the Recoil Spring Guide.
Next, without depressing the Trigger,
move the Slide assembly just far enough
onto the frame to partially insert the
Slide Lock Pin through both the Frame
and the slot in the Recoil Lug. Note:
Carefully press down on the front of the
Ejector as the Slide Back passes over it
to avoid interference as the Slide moves
onto the Frame. Then, pull the slide rear-
ward to line up the Slide Stop Pin with
the relief cut in the Slide. Finally, push
the Slide Stop Pin in until it clicks into
position.
If problems occur during assembly,
remove the slide and recheck the instruc-
tions above.
If the Slide will not go smoothly onto the
Frame, do not force it as this could cause
damage and may void the Warranty.
Reassembly (PM Series)
The closed end of the recoil spring must
be inserted against the flange of the
recoil spring guide. See exploded parts
schematic on page 7.
Make sure the recoil spring and recoil
spring guide are parallel to the slide
rails and not off to one side.
Note: Be sure that the flat disc at the rear
of the recoil spring guide is positioned
properly in the circular cut of the barrel's
recoil lug.