
Manual


smith. If the firing pin indent on primer
appears normal (like similar previously
fired rounds) the ammunition may be at
fault.
Segregate misfired round from other live
ammunition and empty cases, and con-
tinue firing.
Note: Dispose of misfired round in accor-
dance with ammunition manufacturer's
instructions.
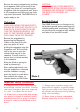
16. Never discharge a firearm near an
animal unless it is trained to accept the
noise. A startled animal could injure
itself or cause an accident.
17. Never walk, climb, follow a compan-
ion or hunt with your pistol in your hand
and ready to fire (in battery).
TENSION AND MAY FLY OFF GUIDE
AND CAUSE INJURY!
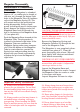
7. Carefully remove Recoil Spring Guide
with Recoil Spring from slide. (see photo #4)
NOTE: DO NOT ATTEMPT TO DISMAN-
TLE THE RECOIL SPRING ASSEMBLY.
THIS IS A FACTORY ASSEMBLED COM-
PONENT. THE RECOIL SPRING IS
DESIGNED TO WORK ONE WAY ONLY.
THE SMALLER DIAMETER END MUST
BE AGAINST THE FLANGE ON THE
REAR OF THE RECOIL SPRING GUIDE.
IMPROPER REASSEMBLY WILL CAUSE
DAMAGE TO THE FIREARM AND CAUSE
INJURY TO THE USER.
8. Grasp recoil lug of Barrel and push it
slightly forward, then lift and pull it rear-
ward out of the slide. (see photo #5)
Photo 4
Photo 5
Important Safety Information
Dismantling (T, P, PM Series)
T9, P9, P9 Covert, PM9, P40, P40 Covert
The KAHR P9 Pistol is dismantled to its
main components in the following steps:
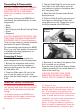
1. Remove the Magazine and visually
check to be sure that the chamber is
empty by pulling back the Slide. (see
photo #1 and #2)
2. Draw the Slide back about 1⁄2 inch so
that the small witness marks on the Slide
and Frame align (see circled area in photo
#3) and internal projection on the Slide
Release Lever can be seen through the
rear semi-circular relief cut in side of the
Slide (see photo #3).
3. Push the pin of the Slide Release Lever
out of the pistol from right to left. (Use a
light, non-marring hammer or plastic
screwdriver handle if necessary).
4. Ease the Slide forward under Recoil
Spring tension.
5. With the Slide Release Lever removed,
pull the Trigger to release the Striker,
then relax pressure on the Trigger and
push the Slide forward off of the Frame.
Photo 3
T, P, PM Series
13