
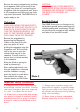
Manual


6. Removal of the barrel (see photos#4 &
#5) is carried out as follows:
Push the rear of the Recoil Spring Guide
slightly forward with the thumb and lift it
clear of the recoil lug.
CAUTION: PROTECT EYES WHEN
REMOVING THE RECOIL SPRING
GUIDE. RECOIL SPRING IS UNDER
13. Never use a firearm that fails to func-
tion properly and never force a jammed
action, as the jammed round may dis-
charge.
14. Always transport the KAHR Pistol
unloaded with the trigger untensioned
(See page 11.) in a locked case.
15. Failure to fire:
Keep the firearm pointed toward the tar-
get and wait 30 seconds after if fails to
fire. If a hangfire (slow ignition) has
occurred, round should fire within 30 sec-
onds. If round does not fire, remove the
magazine, eject the round and check for
an obstruction. Then, examine the
primer. If firing pin indent on primer is
light, off center, or nonexistent, have the
firearm examined by a competent gun-
Dismantling & Reassembly
BEFORE DISMANTLING OR CLEANING
THE KAHR PISTOL, BE ABSOLUTELY
SURE THE PISTOL IS UNLOADED
(Follow the unloading instructions on
page 11).
For normal cleaning, the KAHR Pistol
should only be dismantled into its main
components:
• Slide
• Barrel
• Recoil Spring with Recoil Spring Guide
• Frame
• Magazine
DO NOT DISMANTLE THE PISTOL FUR-
THER THAN THE MAIN COMPONENTS
DESCRIBED ABOVE (except Magazine),
To do so may create an unsafe condition
and affect the pistol’s Warranty.
For maintaining and cleaning the KAHR
Pistol, use only high quality, commercial-
ly available cleaning equipment, sol-
vents and lubricants.
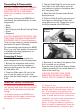
Dismantling (K Series)
The KAHR Pistol is dismantled to its
main components in the following steps:
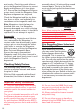
1. Remove the magazine and visually
check to be sure that the chamber is
empty by pulling back the slide. (photo
#1 and photo #2)
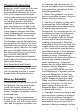
2. Draw the Slide about 3/4 inch to the
rear so that the relief cut in the slide
aligns with the Slide Stop Pin. (see photo
#3a)
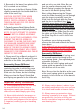
3. Tap the Slide Stop Pin out of the pistol
from right to left with a light, non-mar-
ring hammer or plastic screwdriver han-
dle. (see photo #3b)
4. Ease the slide forward under Recoil
Spring tension.
5. With the Slide Stop Pin removed, pull
the trigger to release the Striker, then
relax pressure on the Trigger and push
the Slide forward off of the Frame.
Photo 3a
K Series
Important Safety Information
Photo 3b
K Series
12