
Instructions / Assembly


8 For Professional Technical Support call 1-844-242-2475
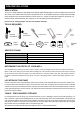
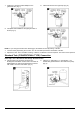
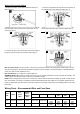
7. Install a 1in.×3/4in.PVC Male Adapter to the
galvanized tee. (Fig. 7)
8. Install a short 3/4in.PVC rigid Pipe. (Fig. 8)
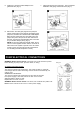
9. Completed well installation with piping and tank is
shown (Fig. 9)
NOTE: If a pre-charged tank becomes waterlogged, the bladder is normally leaking or broken.
1. Test the tank by depressing the air valve. The air valve will expel water if the bladder is broken.
2. Replace the tank. Once a bladder is leaking or broken, the bladder cannot be repaired. The tank must be replaced.
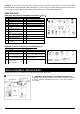
Standard Tank (CONVENTIONAL TYPE) Connection
From step 1 to 3 is the same as Pre-Charge Tank Connection.
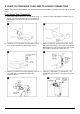
4. Cement 3/4in.PVC rigid Pipe into 3/4in.PVC
90-Degress S×S Elbow. Cement 3/4in. PVC MPT×S
Male Adapter into 3/4in.PVC rigid Pipe that connect
with a 3/4in. PVC FPT×FPT Union .(Fig. 4)
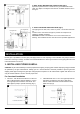
5. Install a 1 in. male NPT x 1 in. female NPT x 1 in.
female NPT galvanized tee to the outlet of the pump.
(Fig. 5)