LIBRETTO ISTRUZIONI E GB Manual de instrucciones Instruction book IGV 657.
Contents Safety instructions 39 Disposal 39 Economical and ecological dishwashing 39 Installation instructions Building-in Levelling Fixing to adjacent units Water supply connections Water inlet hose with safety valve Water outlet hose connection Electrical connection 40 40 40 40 40 40 41 41 Description of the appliance 42 The control panel 42 Prior to using for the first time Setting the water softener Filling with salt Rinse aid 44 44 45 45 In daily use Loading cutlery and dishes The lower b
Safety instructions It is most important that this instruction book should be retained with the appliance for future reference. Should the appliance be sold or transferred to another owner, or should you move house and leave the appliance, always ensure that the book is left with the appliance in order that the new owner can get to know the functioning of the appliance and the relevant safety information. This information has been provided in the interest of your safety.
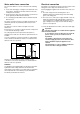
Installation instructions Any electrical and/or plumbing work required to install this appliance should be carried out by a qualified electrician and/or plumber or competent person. Water supply connections This dishwasher may be fed with either hot (max. 50°) or cold water. Nevertheless we advise you a cold water supply. A hot water supply is not always efficient with very soiled crockery as it shortens the washing programmes a lot. Remove all packaging before positioning the machine.
Water outlet hose connection Electrical connection The end of the drain hose can be connected in the following ways: Information concerning the electrical connection is given on the rating plate on the edge of the dishwasher’s door. 1. To the sink outlet spigot, securing it to the underside of the work surface. This will prevent waste water from the sink running into the machine. Before plugging the appliance into the wall socket, make sure that: 1.
Description of the appliance 1. Upper basket stop 2. Water hardness switch 3. Salt container 4. Detergent dispenser 5. Control panel 6. Rating plate 7. Rinse aid dispenser 8. Filters 9. Lower spray arm 10. Upper spray arm 11. Upper basket 12. Worktop IN153 The control panel With the selection of this function the inflow of rinse aid and salt from each respective supply container is automatically deactivated and also the indicator lights for salt and rinse aid are deactivated.
Audible signals Audible signals have been introduced to help inidicate which operations the dishwasher is performing. - setting of the water softener - end of the washing programme - activation of an alarm due to malfunction of the dishwasher Deactivation/activation of the audible signals (The dishwasher must be switched off) 1. Press the On/Off push button. All push buttons indicator lights illuminate (setting mode). 2.
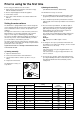
Prior to using for the first time Before using your dishwasher for the first time: b)Setting electronically (The dishwasher must be switched off) 1. Ensure that the electrical and water connections comply with the installation instructions The dishwasher is factory set at level 5. 2. Remove all packaging from inside the appliance 3. Set the water softener 1. Press the On/Off push button. The indicator lights of the programme push buttons will illuminate (setting mode). 4.
Filling with salt Rinse aid Only use salt specifically designed for use in dishwashers. All other types of salt not specifically designed for use in a dishwasher, especially table salt, will damage the water softener. Only fill with salt just before starting one of the complete washing programmes. This will prevent any grains of salt or salty water, which may have been spilt, remaining on the bottom of the machine for any period of time, which may cause corrosion.
● If you are using dishwasher detergent that already contains rinse aid, it is necessary to deactivate the inflow of rinse aid, in order to avoid a double dosage. 3. Press the function push button 2, the indicator lights of function push buttons 1 and 3 turn off while the indicator light of the push button 2 goes on flashing, the digital display indicates the current setting.
Open the door and slide out the baskets to load the dishes. The cutlery basket is in two parts which can be separated to give greater loading flexibility. To separate the two parts, slide them horizontally in opposite directions and pull them apart. To reassemble, reverse the procedure. The lower basket The lower basket is designed to take saucepans, lids, plates, salad bowls, cutlery etc.
Adjusting the height of the upper basket Use of detergent If washing very large plates you can load them in the lower basket after moving the upper basket to the higher position. Only use detergents specifically designed for use in dishwashers. Using no more then the correct amount of detergent contributes to reducing pollution.
Different kinds of detergent Detergent tablets Use of "3 in 1" combi detergents Detergent tablets of different brands dissolve at different speeds. For this reason some detergent tablets cannot dissolve and develop their full cleaning power during short programmes. Therefore please use long programmes when using detergent tablets, to ensure the complete removal of detergent residuals. Do not place the tablets in the tub or in the cutlery basket as this will result in poorer wash results.
Washing programmes Programme Intensive 70° Auto 65° (1) Quick 65° (2) Eco 50° Rinse and Hold Degree of soil and type of load Programme push button Heavy soil. Crockery, cutlery, pots and pans Normal soil.
Starting a washing programme In this fully integrated appliance the controls are located on the top of the door. When selecting a programme, the door needs to be open. 6. End of the washing programme The dishwasher will automatically stop and an audible signal informs you of the end of the washing programme. When the wash programme has ended, the optical signal on the floor beneath the dishwasher’s door will turn off. Open the dishwashers’s door only when this optical signal turns off. 1.
Maintenance and cleaning Clean the external surfaces of the machine and control panel with a damp soft cloth. If necessary use only neutral detergents. Never use abrasive products, scouring pads or solvent (acetone, trichloroethylene etc....). 9. Put the filter combination in place and lock by turning the handle clockwise to the stop. During this process ensure that the flat filter does not protrude above the base of the washing compartment.
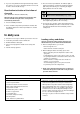
What to do, when... Certain problems are due to the lack of simple maintenance or oversights, which can be solved with the help of the instructions given here, without calling out an engineer. ...a flashing fault code appears The dishwasher does not start or stops during operation. An audible signal advises you of the intervention of an alarm. A fault code visible in the digital display (see following chart). Open the dishwasher’s door and carry out the following suggested corrective actions.
...the wash results are not satisfactory The dishes are not clean ● ● ● ● ● ● ● ● The wrong washing programme has been selected. The dishes were arranged in such a way as to stop water reaching all parts of the surface. The baskets must not be overloaded. The spray arms do not rotate freely due to wrong arrangement of the load. The filters in the base of the washing compartment are dirty or incorrectly positioned. Too little or no detergent has been used.
Hints for test centres Testing in accordance with EN 60704 must be carried out with appliance fully loaded and using the test programme (see "Washing programmes" chart). Test in accordance with EN 50242 must be carried out when the salt dispenser and rinse aid container have been filled with salt and rinse aid respectively and using the test programme (see "Washing programmes" chart).
Küppersbusch Vertriebsgesellschaft mbH Postfach 10 01 32, D-45801 Gelsenkirche, Küppersbuschstraße 16, D-45883 Gelsenkirchen Telefon (02 09) 4 01-0, Telefax (02 09) 4 01-3 03 152967 23/1 Con riserva di modifiche - Salvo modificaciones Subject to change without notice 1 02/04