
User manual

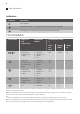


German de-
grees (°dH)
French de-
grees (°fH)
mmol/l Clarke de-
grees
Water softener
level
4 - 10 7 - 18 0.7 - 1.8 5 - 12 2
<4 <7 <0.7 < 5
1
2)
1)
Factory setting.
2)
Do not use salt at this level.
Whether you use a standard detergent
or multi-tabs (with or without salt), set
the proper water hardness level to
keep the salt refill indicator active.
Multi-tabs containing salt are not
effective enough to soften hard
water.
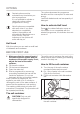
How to set the water softener
level
The appliance must be in programme
selection mode.
1.
To enter the user mode, press and hold
the programme button until the
indicator starts to flash and the
indicator comes on with fixed light.
2.
Wait until the indicator goes off and
the indicator starts to flash. The
indicator continues to flash. The
intermittent flashing of the indicator
refers to the current set level.
• E.g. 5 flashes + pause + 5 flashes =
level5.
3. Press programme button repeatedly to
change the setting. Each time you press
programme button the level number
increases. After level 10 you will start
again from level 1.
4. Press the on/off button to confirm the
setting.
Acoustic signals
Acoustic signals sound when a malfunction
of the appliance occurs. It is not possible to
deactivate these acoustic signals.
There is also an acoustic signal that sounds
when the programme is completed. By
default this acoustic signal is deactivated
but it is possible to activate it.
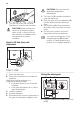
How to activate the acoustic
signal for the end of programme
The appliance must be in programme
selection mode.
1. To enter the user mode, press and hold
the programme button until the
indicator
starts to flash and the
indicator comes on with fixed light.
2.
Press immediately the programme
button.
• The indicator comes on with
fixed light.
• The indicator
starts to flash.
3.
Wait until the indicator goes off. The
indicator continues to flash.
• The end indicator indicates the
current setting: End indicator off =
Acoustic signal off.
4. Press the programme button to change
the setting.
• End indicator on = Acoustic signal
on.
5. Press the on/off button confirm the
setting.
8