User manual Dishwasher IGV6504.
Contents Safety information Product description Control panel Use of the appliance Setting the water softener Use of dishwasher salt Use of rinse aid Loading cutlery and dishes Use of detergent 2 3 4 5 5 7 7 8 10 Setting and starting a washing programme 11 Care and cleaning 13 What to do if… 14 Technical data 15 Installation 16 Water connection 16 Electrical connection 17 Environment concerns 18 Subject to change without notice Safety information For your safety and correct operation of the appliance,
• A qualified and competent person must do the plumbing installation. • Do not change the specifications or modify this product. Risk of injury and damage to the appliance. • Do not use the appliance: – if the mains cable or water hoses are damaged, – if the control panel, worktop or plinth area are damaged, that you can get access to the inner side of the appliance. Contact your local Service Force Centre.
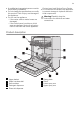
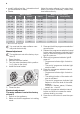
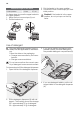
Control panel 1 2 3 4 5 On/off button Half-load button Programme selection/cancel button (RESET) Indicator lights Programme indicator lights Indicator lights End-of-programme The indicator light comes on when the washing programme is completed. Auxiliary functions: • Level of the water softener. • Activation/deactivation the audible signals. • An alarm if the appliance has a malfunction. Rinse aid 1) The indicator light comes on when it is necessary to fill the rinse aid.
With the half-load button pressed the time duration and the consumption of water and energy are reduced. Programme indicator lights A and B Apart the selection of the corresponding washing programme, these lights have an auxiliary functions: • The adjustment of the water softener level. • Deactivation/activation of the audible signals. Setting mode The appliance is in setting mode when all the programme indicator lights are off and the end-of-programme indicator light flashes.
• mmol/l (millimol per litre - international unit for the hardness of water). • Clarke. Adjust the water softener to the water hardness in your area. If necessary, contact your local water authority.
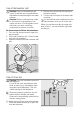
Use of dishwasher salt Caution! Only use dishwashers salt. Types of salt that are not applicable for dishwashers cause damage to the water softener. Caution! Grains of salt and salty water on the bottom of the appliance can cause corrosion. Fill the appliance with salt before you start a washing programme to prevent corrosion. Do these steps to fill the salt container: 1. Turn the cap anticlockwise to open the salt container. 2. Fill the salt container with 1 litre of water (only the first operation). 3.
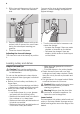
2. Fill the rinse aid dispenser with rinse aid. The mark 'max.' shows the maximum level. 3. Remove the spilled rinse aid with an absorbent cloth to prevent too much foam during the subsequent washing programme. 4. Close the rinse aid dispenser. Adjusting the rinse aid dosage The rinse aid is set at the factory at position 4. You can set the rinse aid dosage between position 1 (lowest dosage) and position 6 (highest dosage). 1. Turn the rinse aid dial to increase or decrease the dosage.
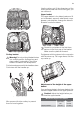
Use the cutlery grid. If the dimensions of the cutlery prevent the use of the cutlery grid, you can remove it. Upper basket The upper basket is for plates (maximum 24 cm in diameter), saucers, salad bowls, cups, glasses, pots and lids. Arrange the items to let water touch all surfaces. Prevent to put plates in the first three sectors in the front part of the basket. Make sure the plates tilt forward. Cutlery basket Warning! Do not put long-bladed knives in a vertical position.
Maximum height of the dishes Lower position 24 cm 27 cm Do these steps to move the upper basket to the upper position: 1. Move the front runner stops (A) out. 2. Pull the basket out. 3. Put the basket in the upper position. 4. Put back the front runner stops (A) in their initial position. Caution! If the basket is in the upper position, do not put cups on the cup racks. Use of detergent Only use detergents (powder, liquid or tablet) that are applicable for dishwashers.
When you use tablets, that contain special salt and rinse aid, it is not necessary to fill the salt and rinse aid containers. In this condition the rinse aid indicator light stays on when the appliance is switched on. 1. Do a check if these tablets are applicable for the local water hardness. Refer to the instructions from the manufacturer. 2. Select the lowest setting for the water hardness and rinse aid dosage. Do these steps if the drying results are not satisfactory 1.
– The end-of-programme indicator light starts to flash. 2. Release the programme selection/cancel button to cancel the washing programme. At this time you can do these steps: 1. Switch off the appliance. 2. Set a new washing programme. Fill the detergent dispenser with detergent before you set a new washing programme. Interrupting a washing programme Open the door. • The programme stops. Close the door. • The programme continues from the point of interruption.
Programme Prewash Degree of soil Any Type of load Programme description Partial load (to be completed later in the day). 1 cold rinse (to prevent food scraps to bond). Detergent is not necessary with this programme. Half-load option Not selectable 1) With half-load option selected, prewash phase is not included. Do not use detergent for prewash phase. 2) This is the perfect daily programme to clean a not fully load.
10. Put the coarse filter (A) in the microfilter (B) and push the filters together. 11. Put the filter system in position. 12. To lock the filter system, turn the handle on the microfilter (B) clockwise until it lock in position. 13. Install the lower basket. 14. Close the door. Do not remove the spray arms. 4. Remove the filter system. 5. Hold the coarse filter (A) by the handle with the hole. 6. Remove the coarse filter (A) from the microfilter (B). 7.
Fault code and malfunction Possible cause and solution • continuous flash of the light of the running programme • intermittent audible signal • 2 flashes of the end-of-programme indicator light The appliance will not drain the water. • There is a blockage in the sink spigot. Clean the sink spigot. • The connection of the water drain hose is not correct. The hose can be kinked or squashed. Make sure that the connection is correct.
Height cm 81,8 - 89,8 Depth cm 55 Electrical connection - Voltage Overall power - Fuse Information on the electrical connection is given on the rating plate on the inner edge of the dishwasher door. Water supply pressure Minimum 0,5 bar (0,05 MPa) Maximum 8 bar (0,8 MPa) Capacity Place settings 12 Installation Warning! Make sure that mains plug is disconnected from the mains socket during installation.
Be careful when you connect the water inlet hose: • Do not put the water inlet hose or the safety valve in water. • If the water inlet hose or the safety valve is damaged, immediately disconnect the mains plug from the mains socket. • Only let the Service Force Centre replace the water inlet hose with safety valve. Warning! Dangerous voltage Water drain hose 1. Connect the water drain hose to the sink spigot and attach it under the work surface.
Do not pull the mains cable to disconnect the appliance. Always pull the mains plug. Environment concerns The symbol on the product or on its packaging indicates that this product may not be treated as household waste. Instead it should be taken to the appropriate collection point for the recycling of electrical and electronic equipment.
117954910 - 00 - 032009