EN User Manual Dishwasher IG6504.
CONTENTS Safety information Safety instructions Product description Control panel Programmes Settings 2 3 5 6 7 7 Before first use Daily use Hints and tips Care and cleaning Troubleshooting Technical information 9 10 11 12 14 17 Subject to change without notice. SAFETY INFORMATION Before the installation and use of the appliance, carefully read the supplied instructions. The manufacturer is not responsible for any injuries or damages that are the result of incorrect installation or usage.
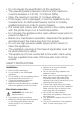
• • • • • • • • • • Do not change the specification of this appliance. The operating water pressure (minimum and maximum) must be between 0.5 (0.05) / 8 (0.8) bar (MPa) Obey the maximum number of 13 place settings. If the supply cord is damaged, it must be replaced by the manufacturer, its Authorised Service Centre or similarly qualified persons in order to avoid a hazard. Put knives and cutlery with sharp points in the cutlery basket with the points down or in a horizontal position.
necessary to change the fuse in the mains plug, use fuse: 13 amp ASTA (BS 1362). Water connection • Do not cause damage to the water hoses. • Before connection to new pipes, pipes not used for a long time, where repair work has been carried out or new devices fitted (water meters, etc.), let the water flow until it is clean and clear. • Ensure that there are no visible water leaks during and after the first use of the appliance.
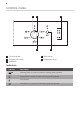
PRODUCT DESCRIPTION 1 2 11 10 1 2 3 4 5 6 Upper spray arm Lower spray arm Filters Rating plate Salt container Air vent 9 8 7 6 5 4 7 8 9 10 11 Rinse aid dispenser Detergent dispenser Cutlery basket Lower basket Upper basket 3
CONTROL PANEL 1 2 5 1 On/off indicator 2 Programme marker 3 Indicators 3 4 4 Start button 5 Programme knob Indicators Indicator Description Washing phase. It comes on when the washing phase operates. Drying phase. It comes on when the drying phase operates. End indicator. Salt indicator. It is always off while the programme operates.
PROGRAMMES Programme 2) 3) 4) Degree of soil Type of load Programme phases Normal soil Crockery and cutlery • • • • Heavy soil Crockery, cutlery, pots and pans Consumption values 1) Duration (min) Energy (kWh) Water (l) Prewash Wash 50 °C Rinses Dry 195 1.039 11 • • • • Prewash Wash 70 °C Rinses Dry 140 160 1.5 - 1.6 13 - 15 Normal soil Crockery and cutlery • • • • Prewash Wash 65 °C Rinses Dry 120 130 1.3 - 1.
detrimental effect on the washing results and on the appliance. How to set the programme selection mode The higher the content of these minerals, the harder your water is. Water hardness is measured in equivalent scales. The appliance is in programme selection mode when the on/off indicator comes on and start indicator starts to flash. When you activate the appliance, usually it is in programme selection mode.
1. Make sure that the programme marker on the knob is aligned with the indicator on/off . 2. To enter the user mode, turn the knob counterclockwise until the symbol of the first programme is aligned with the on/off indicator. Press and hold the Start until the indicators start , on/off and start to flash. • The intermittent flashing of refers to the current set level, e.g. 5 flashes + pause + 5 flashes = level 5. 3. Press the Start button again and again to change the setting.
How to fill the rinse aid dispenser 1. Press the release button (D) to open the lid (C). 2. Pour the rinse aid in the dispenser (A) until the liquid reaches the fill level 'max'. 3. Remove the spilled rinse aid with an absorbent cloth to prevent too much foam. 4. Close the lid. Make sure that the release button locks into position. B E A M AX 4 1 3 2 + - C D CAUTION! Only use rinse aid specifically designed for dishwashers. Fill the rinse aid dispenser when the indicator (E) becomes clear.
• On/off indicator comes on. • Start indicator starts to flash. 4. Press Start. • The programme starts and the indicator of the washing phase is on. • On/off indicator and start indicator are on. Opening the door while the appliance operates If you open the door while a programme is running, the appliance stops. It may affect the energy consumption and the programme duration. When you close the door, the appliance continues from the point of interruption.
• Do not use more than the correct quantity of detergent. Refer to the instructions on the detergent packaging. What to do if you want to stop using multi-tablets Before you start to use separately detergent, salt and rinse aid do the following procedure. 1. Set the highest level of the water softener. 2. Make sure that the salt and rinse aid containers are full. 3. Start the shortest programme with a rinsing phase. Do not add detergent and do not load the baskets. 4.
C B A 1. Turn the filter (B) counterclockwise and remove it. 2. Remove the filter (C) out of filter (B). 3. Remove the flat filter (A). 4. Wash the filters. 5. Make sure that there are no residues of food or soil in or around the edge of the sump. 6. Put back in place the flat filter (A). Make sure that it is correctly positioned under the 2 guides. 7. Reassemble the filters (B) and (C). 8. Put back the filter (B) in the flat filter (A). Turn it clockwise until it locks.
Internal cleaning CAUTION! An incorrect position of the filters can cause bad washing results and damage to the appliance. • Carefully clean the appliance, including the rubber gasket of the door, with a soft damp cloth. • If you regularly use short duration programmes, these can leave deposits of grease and limescale inside the appliance. To prevent this, we recommend to run long duration programmes at least 2 times per month.
Problem and alarm code Possible cause and solution The appliance does not fill with water. • The end indicator flashes 1 time intermittently. • The Start indicator flashes continuously. • Make sure that the water tap is open. • Make sure that the pressure of the water supply is not too low. For this information, contact your local water authority. • Make sure that the water tap is not clogged. • Make sure that the filter in the inlet hose is not clogged.
The washing and drying results are not satisfactory Problem Possible cause and solution Poor washing results. • Refer to "Daily use", "Hints and tips" and basket loading leaflet. • Use more intensive washing programmes. • Clean spray arm jets and filter. Refer to "Care and Cleaning". Poor drying results. • Tableware has been left for too long inside a closed appliance. • There is no rinse aid or the dosage of rinse aid is not enough. Set the rinse aid dispenser to a higher level.
Problem Possible cause and solution There are residues of detergent in the dispenser at the end of the programme. • The detergent tablet got stuck in the dispenser and therefore was not completely washed away by water. • Water cannot wash away the detergent from the dispenser. Make sure that the spray arm is not blocked or clogged. • Make sure that items in the baskets do not impede the lid of the detergent dispenser from opening. Odours inside the appliance. • Refer to "Internal cleaning".
Power consumption Off-mode (W) 0.50 1) Refer to the rating plate for other values. 2) If the hot water comes from alternative source of energy, (e.g. solar panels, aeolian energy), use the hot water supply to decrease energy consumption. ENVIRONMENTAL CONCERNS Recycle the materials with the symbol . Put the packaging in applicable containers to recycle it. Help protect the environment and human health and to recycle waste of electrical and electronic appliances.
X X Hydraulic circuit (including tanks)* Wiring harnesses * X X Hg Cd Cr6+ Hazardous substances PBBs PBDEs Note: 1. This table is compiled according to SJ/T11364-2014. means that this kind of hazardous substance content in all of the homogenous materials of this part is under the limitations 2. regulated in GB/T26572-2011. 3. X means that this kind of hazardous substance content in at least one homogenous material of this part exceeds the limitations regulated in GB/T26572-2011. 4.
Küppersbusch Hausgeräte GmbH Postfach 10 01 32, D-45801 Gelsenkirchen, Küppersbuschstr. 16, D-45883 Gelsenkirchen Telefon: (02 09) 4 01-0, Telefax: (02 09) 4 01-3 03 www.kueppersbusch.